The post Webinar – Getting your invoices paid on time appeared first on Okappy.
]]>Our webinar – Raising invoices and Getting Paid Quicker was on the 19th May 2021.
We were joined by Paul Layte FCA from Next Level Business. Paul is a business growth specialist who has founded several high profile corporate start-ups and has worked in board level roles in four different listed businesses. A chartered accountant by background with a passion for growing businesses of all shapes and sizes which he now does through his own digital chartered accountancy firm Next Level Business where Paul, as the founder and CEO also provides advisory and CFO support to many ambitious small businesses ans SME’s.
Who is Okappy?
Okappy is a business 2 business connected workforce management platform which applies social and market networking technology to a real business need. The need to communicate and collaborate with your employees who are often at different locations (and now more than ever). With your subcontractors and with your customers.
Okappy helps the most forward looking and dynamic companies increase transparency, reduce duplication, costs and errors and increase efficiency. Ultimately making a significant contribution to bottom line profits.
With Okappy, you can connect to your employees, customers and subcontractors.
Send and receive jobs.
See the status of those jobs as they’re updated by your engineers and subcontractors
Then raise your invoices at the touch of a button.
It’s those first three points which I am touching on today.
Late payments are an issue

Late payments are an issue in the UK. Particularly in some of the sectors that customers work in. i..e, construction, facilities management, housing.
Research by BAC, the payment organization, suggests that £32.4 billion is owed which equates to about £35k for the average smaller enterprise.
Late payments are due to a number of factors. What gets the most headlines is large companies delaying payment to improve their own cash flow. But a lot is also due to your own processes. One of the big changes we see in companies that move to digital workforce management is the speed in which invoices can be generated. Systems are obviously part of it, but processes are also key which I’m sure Paul will talk about.
I think what we want you to take away is that late payments can be a headache but there is a lot you can do about it to make the whole process smoother, more efficient and much quicker.
Introducing Paul Layte, Next Level Business
On that note, I’m going to introduce you to Paul.
Paul, CEO and founder of Next Level Business, the Growth Accountants. He has founded, grown and exited several high-profile corporate startups in the telecoms and technology sectors.
He’s worked in board level roles in four different listed businesses and been a non-executive director and chairman of several smaller companies.
Like me, Paul is a keen motorsports enthusiast, Paul likes rugby and reminiscing about past sporting glories in the swimming pool. So maybe that’s a question you can ask him about at the end.
Invoicing Top Tips
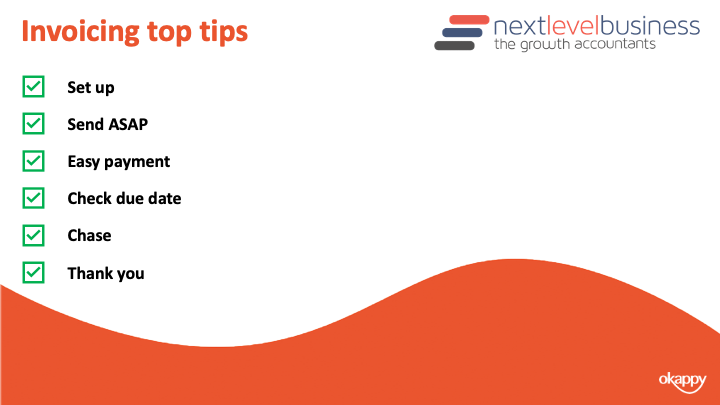
When you’re onboarding a customer, ensure they are set up correctly. You know what information is required on their invoices.
Send your invoices as soon as possible. A lot of delays are actually caused by the invoice not going out in the first place.
Ensure it is easy for your customer to pay your invoice. Ensure your bank details are correct, any additional such as IBAN numbers are included and that your business name matches your bank account name.
Also offer different options for your customers. Can they pay by BACs, credit card or debit card.
Monitor the due date of your invoices. And ensure you give your customer a call a week before the invoice is due. This ensures that everything is in order before they attempt payment.
This also entitles you to chase your invoices as soon as it is overdue. If you chase the day after the due date, then your customer will learn that you will always follow up on overdue invoices. If they are looking to delay payments then it’s likely they will delay the invoices from customers they haven’t heard from rather than the ones that make the most noise.
Finally once your customer has paid your invoice. Don’t forget to thank them.
Ensuring Your Invoice has been raised in Okappy
One of the first decision companies make when joining Okappy is how to put in a control to ensure that you have raised your invoices.
A lot of companies we speak to talk about the difficulty of getting job sheets back from their guys, understanding what has been done and then raising an invoice in a timely manner. Particular when companies rely on paperwork or spreadsheets it’s too easy to forget to raise an invoice and we certainly hear that a lot.
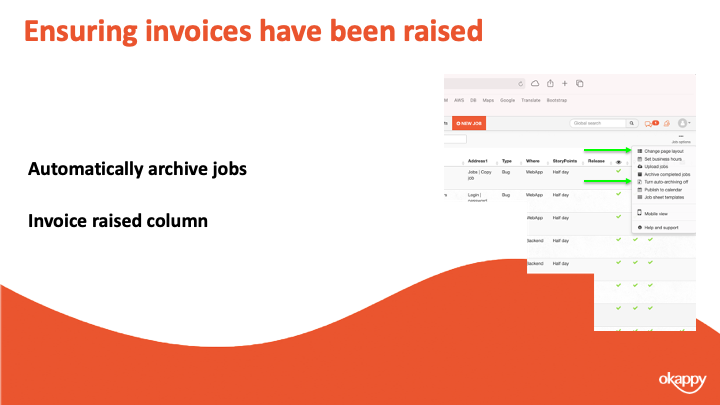
With Okappy, there are 2 ways you can keep on top of that process and ensure an invoice has been raised.
1) The first way is to automatically archive jobs once the invoice has been raised. This way you can see at a glance that if there are completed jobs on your dashboard then an invoice hasn’t been raised.
2) The second way is to add the invoiced column to your dashboard. That way you can see a tick once the invoice has been raised.
It’s up to you which process you use, most go with the first as it keeps the dashboard cleaner and helps you see the wood from the trees.
Raising invoices in Okappy

The second step in using a system is to determine how you can raise an invoice.
With Okappy, there’s various ways. You can raise an invoice from a job
You can raise it from a quote or you can raise a miscellaneous invoice.
One thing to note with the network, you can also receive invoices from your subcontractors or suppliers. That includes our invoices to you.
Raising invoices from a job
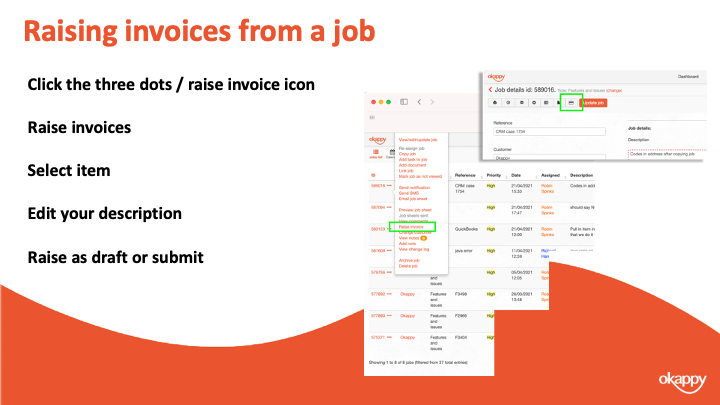
To raise an invoice from a job
- Click the three dots next to your job
- Select Raise invoices
- Select item (product or service)
- Edit your description
- Raise as draft or submit
Raising invoices from a Quote
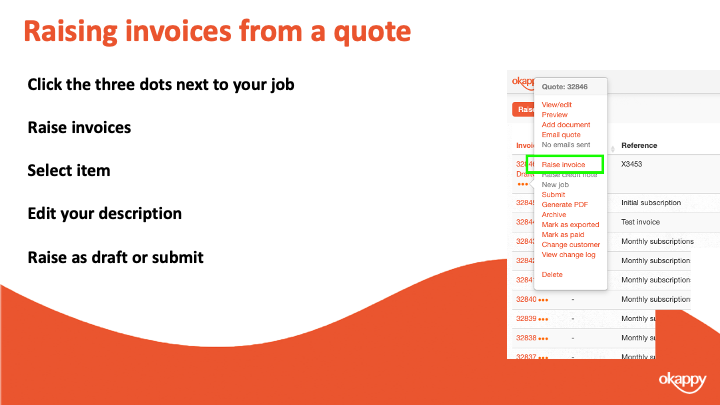
To raise an invoice from a quote
- Click the three dots next to your job
- Select Raise invoices
- Select item (product or service)
- Edit your description
- Raise as draft or submit
Raising miscellaneous invoices
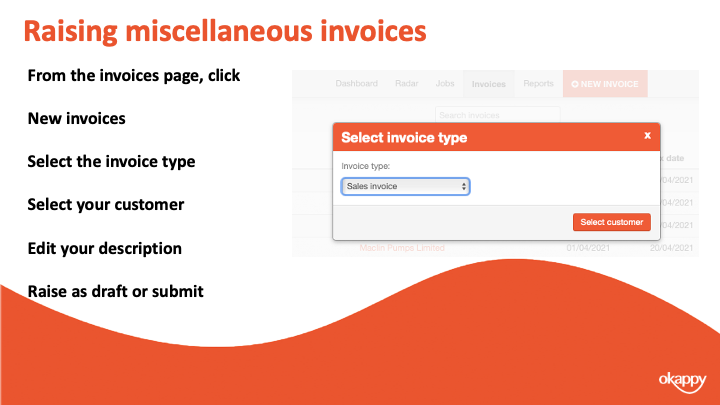
To raise a miscellaneous invoice
- Click the three dots next to your job
- Select Raise invoices
- Select item (product or service)
- Edit your description
- Raise as draft or submit
Submitting your invoices
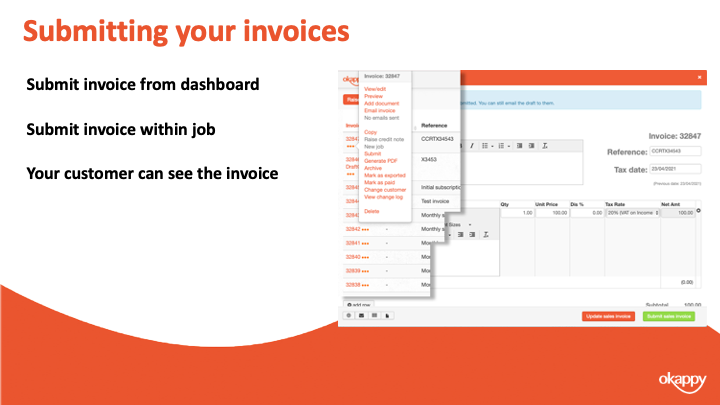
Submitting your invoices.
Changing your invoice from Draft to Submitted means that your customer can view your invoice and pay it (depending on your settings)
Seeing when your invoice has been paid
One thing Paul mentioned was being on top of which invoices have been paid. With Okappy you can look at it at a granular level with each invoice. You can also see how much is owed at a customer level.
The first thing to note is how the invoices actually get marked as paid. There’s three ways this can be done.
- You can manually mark the invoice as paid. To do that click the three dots next to the relevant invoice and click Mark as paid
- If you are using Xero and it’s connected to Okappy, then marking the invoice as paid within Xero will also mark the invoice as paid within Okappy automatically.
- The final way that invoices get marked as paid is if they are paid through Okappy’s own payment gateway. I’ll talk more about that in a bit, but if a customer pays an invoice via Okappy then you will see that the invoice has been paid and when. You can also set up email alerts to notify that an invoice has been paid.
Once an invoice has been marked as paid then this can be seen in three areas.
You can see it in your invoices dashboard, the paid column towards the right of the screen.
You can see it when raising a job. When you select a customer, their outstanding balance is shown which is the value of all invoices raised less those which have been paid.
There’s also a couple of reports – the invoices paid report and the outstanding invoices report which shows which invoices have been paid or not.
Receiving payments through Okappy
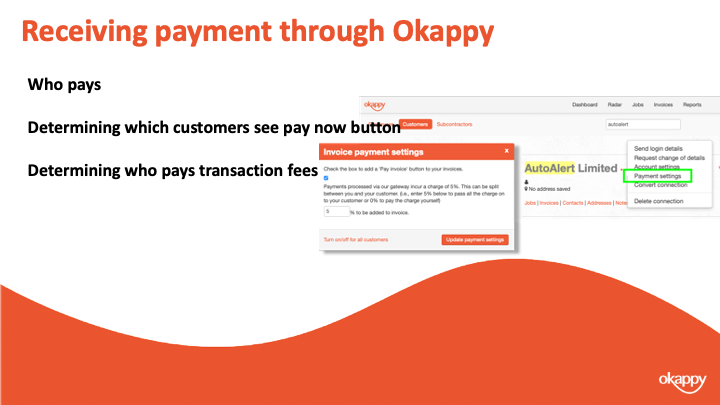
Paul mentioned about making it easy for your customer to pay you.
If you are taking payments through BACS or direct, then ensure your invoice template is updated with all the correct details.
You also have the option to take payment through Okappy. To do this, you simply enable the payment button on your invoices. When a customer clicks the button they’ll be taken to our payment gateway where they can make a secure payment to cover your invoice.
You can determine which customers the button shows for, you can show it on all your invoices or not show it all.
To change the setting for all customers, go to invoice options and then select the payment button link.
To change the settings for a specific customer. Go to the connections screen, find the relevant customer and click Payment settings
The first checkbox determines whether the Pay invoice button shows or not.
You can also set who pays the transaction charge. It can be added to the invoice in which case your customers who pays. It can be taken off the invoices in which case you get the amount of the invoice less the transaction charge. Or you can split the payment between yourself and your customer.
A quick recap
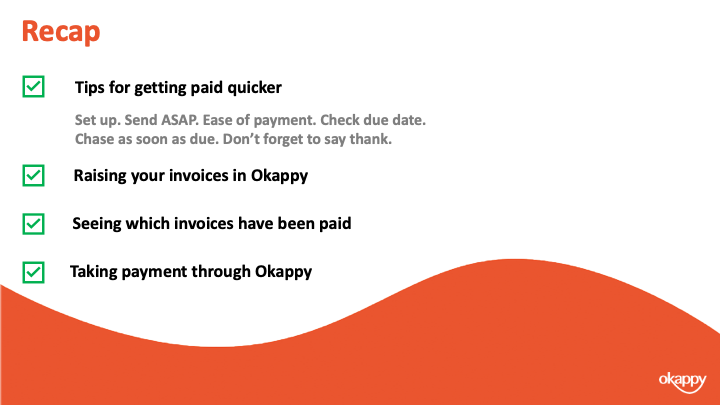
We talked about tips for getting paid quicker including ensure the setup of your customer is correct, ensure invoices are sent in a timely manner and keep an eye on the due date.
Chase as soon as the invoice is due and don’t forget to say thank you
We showed you three ways to raise your invoices on Okappy. From a job, from a quote and a miscellaneous invoice.
We showed various ways that you could see whether an invoice has been paid or the value of all invoices outstanding.
Finally we discussed using the pay now functionality from within Okappy to automate your process and make it easier for your customer to pay your invoices.
Further information and support
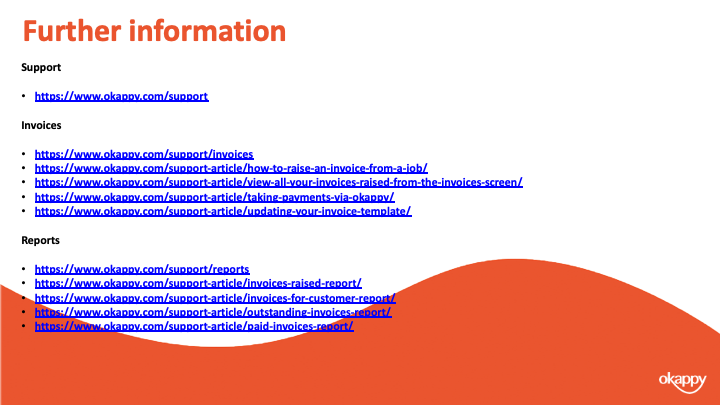
There’s lots of information on our help and support pages including help articles, questions and answers and videos.
Here’s some links to articles which we have covered today.
https://www.okappy.com/support
Invoices
https://www.okappy.com/support/invoices
https://www.okappy.com/support-article/how-to-raise-an-invoice-from-a-job/
https://www.okappy.com/support-article/view-all-your-invoices-raised-from-the-invoices-screen/
https://www.okappy.com/support-article/taking-payments-via-okappy/
https://www.okappy.com/support-article/updating-your-invoice-template/
Reports
https://www.okappy.com/support/reports
https://www.okappy.com/support-article/invoices-raised-report/
https://www.okappy.com/support-article/invoices-for-customer-report/
https://www.okappy.com/support-article/outstanding-invoices-report/
https://www.okappy.com/support-article/paid-invoices-report/
A number of short, self explanatory videos are also available.
Thanks for attending our webinar
Thanks once again for attending our webinar. I hope you found it useful.
Please connect with Okappy on twitter at @ok_appy or follow us on LinkedIn at https://www.linkedin.com/company/okappy-ltd-
You can also follow Next Level Business at on twitter at @_nlbusiness or on LinkedIn at https://www.linkedin.com/company/next-level-business
View the webinar
Get the webinar slides
The post Webinar – Getting your invoices paid on time appeared first on Okappy.
]]>The post Webinar – Top things you didn’t know about Okappy appeared first on Okappy.
]]>Our Webinar on Wednesday 21st April at 2pm covered three things you might not know about Okappy.
- How to build your network on Okappy
- Creating and editing your own job templates
- Adding files, images and other documents to the system
The webinar lasts for 30 minutes during which time you’ll hopefully takeaway some nifty tips you can use to get the most from Okappy’s Portal+.
Introducing Okappy
Okappy is a business 2 business connected workforce management platform which applies social and market networking technology to a real business need. The need to communicate and collaborate with your employees who are often at different locations (and now more than ever). With your subcontractors and with your customers.
Okappy helps the most forward looking and dynamic companies increase transparency, reduce duplication, costs and errors and increase efficiency. Ultimately making a significant contribution to bottom line profits.
With Okappy, you can connect to your employees, customers and subcontractors. Send and receive jobs and see the status of those jobs as they’re updated by your engineers and subcontractors out in the field.
Once the job is complete, you can raise your invoices at the touch of a button.
Top 3 tips to get the most from Okappy
- Building your network on Okappy Portal+
- Creating and editing your own job templates
- Adding files, images, signatures and other documents
We chose these three top tips as that’s where we get the most interest.
People are interested in the network as it’s a new way of doing business. It’s helping the most forward looking for companies reduce duplication and errors. It’s helping them provide the best customer service and real time reporting to their own customers and it’s helping them streamline their processes when managing employees and subcontractors.
People are interested in building their own templates. It’s a relatively new feature and allows companies to really fit Okappy around their specific requirements. And I’ll talk more about how different use this functionality in different ways,
Finally, we talk about adding files, images and signatures. Although a lot of our customers get up to speed quickly with adding attachments to jobs. There is actually a lot more you can do with Okappy. You can add documents to customers, employees and subcontractors which could include things like copies of insurance certificates or contractors which means you always have information close to hand. In addition, there’s more ways you can retrieve that information which I’ll take you through in a bit.
1) Build your network on Okappy Portal+
Okappy is unique in that it’s always been built around a connected network approach. While other workforce management systems may work well internally, they quickly fall down when other companies are involved in the work.
And in this day and age, companies don’t work in isolation. With outsourcing, with specialist knowledge and equipment more and more companies collaborate. In fact, a Gartner research report said that by this year almost half or all work will be done by engineers and technicians not directly employed by you.
This can cause issues and we hear a lot about the duplication of information between different company’s systems. We hear about the hassle of providing reports to customers and their increasing demands to get the reports more quickly. We also here a about the mistakes, delays and missed jobs caused by having to copy information from one system to another.
With Okappy’s Portal+ network, you can connect to your customers and subcontractors. You can receive work from your customers or add work on their behalf and you can assign that work to your employees or subcontractors.
Everyone involved in that work can see the latest status of the job which means your customers don’t have to chase you and you don’t need to chase your employees or subcontractors.
It also means information is kept up to date, if your customers updated their contacts details the change is immediately available to you. Likewise, if you update your details that information is shared with your network.
Connecting to your customers
So how do you build your network.
To send a connect request, simply
- click the connection icon towards the top right of the screen
- Enter your customer’s details, and
- Send the invite.
They’ll be notified that you want to connect.
If they accept your invitation, they can log in and view their own account which is completely independent from yours. They can add jobs and assign them to you, or you can add jobs on their behalf which they can see. However, they can’t see any of your other jobs. They also can’t see which employees or subcontractors is doing the work. This ensure privacy and leaves you in control of the work.
Why connect to your customers on Okappy Portal+?
- Reduced duplication
- No more missed jobs
- Reduce chasing of emails and calls
- See the latest contact details
- Provide the best customer service
You can also save documents for your customers which will talk more about later.
You can add notes for your customer, get your invoices seen and paid quicker including taking payment.
Management gurus often talk about looking at your customers base to see which companies add to your profit and which add to your costs. Consultants will often tell you that 80% of your profits come from 20% of your customers. With Okappy you can run various reports on how to see which work you did for which companies.
You can also search for other companies on the Okappy network so you can actually find new customers or subcontractors when you’re ready to grow.
Connecting to your subcontractors on Okappy Portal+
You can connect to subcontractors in the same way that you connect to customers.
To send a connect request, simply
- Click the connection icon towards the top right of the screen
- Enter your subcontractors’ details, and
- Send the invite.
They’ll be notified that you want to connect.
Like customers they can only see the jobs that have been assigned to you. The information they see is also restricted, they cannot see who your customer is so you don’t need to worry that they’ll try and cut you out of the leep.
One important difference between customers and subcontractors is that subcontractors have to accept your invite before you can assign jobs to them. This is an important distinction as you want to know that your subcontractor has receive your work and is going to act on it.
Why connect to your subcontractors on Okappy Portal+
- Reduced duplication
- No more missed jobs
- Reduce chasing of emails and calls
- See the latest contact details
- Manage your subcontractors more easily
You can also save documents for your subcontractors which will talk more about later.
You can add notes for your subcontractor, get your invoices seen and paid quicker including taking payment.
You can also analyze how your subcontractors are working and compare them to your employees.
You can also search for other companies on the Okappy network so you can find new customers or subcontractors when you’re ready to grow.
2) Create job templates
Our second top tip is around creating job templates
This is a new feature on Okappy is the ability to create and edit your own job templates. Our aim with Okappy has always been to keep it simple so if you’re on the coal face you’re not having to think what fields you need to fill in and what information is required.
When you add and update a job it was always based around a template. But in the past, we had to create those templates for you manually which takes time, is costly to you and can lead to errors. A couple of years ago we started work on new functionality to enable you to easily create your own templates. Once your templates are created you can edit them.
We continue to develop the template builder to make it easier and simpler to use. We’ve also added new field types to the check sheets so you can choose from dropdowns, checkboxes, text areas and others.
We’ve seen lots of companies get creative in how they use the template functionality including adding templates for different reasons such as holiday check forms or even covid notifications. We’ve seen some complex check sheets including inventory checks and gas and electrical certificates.
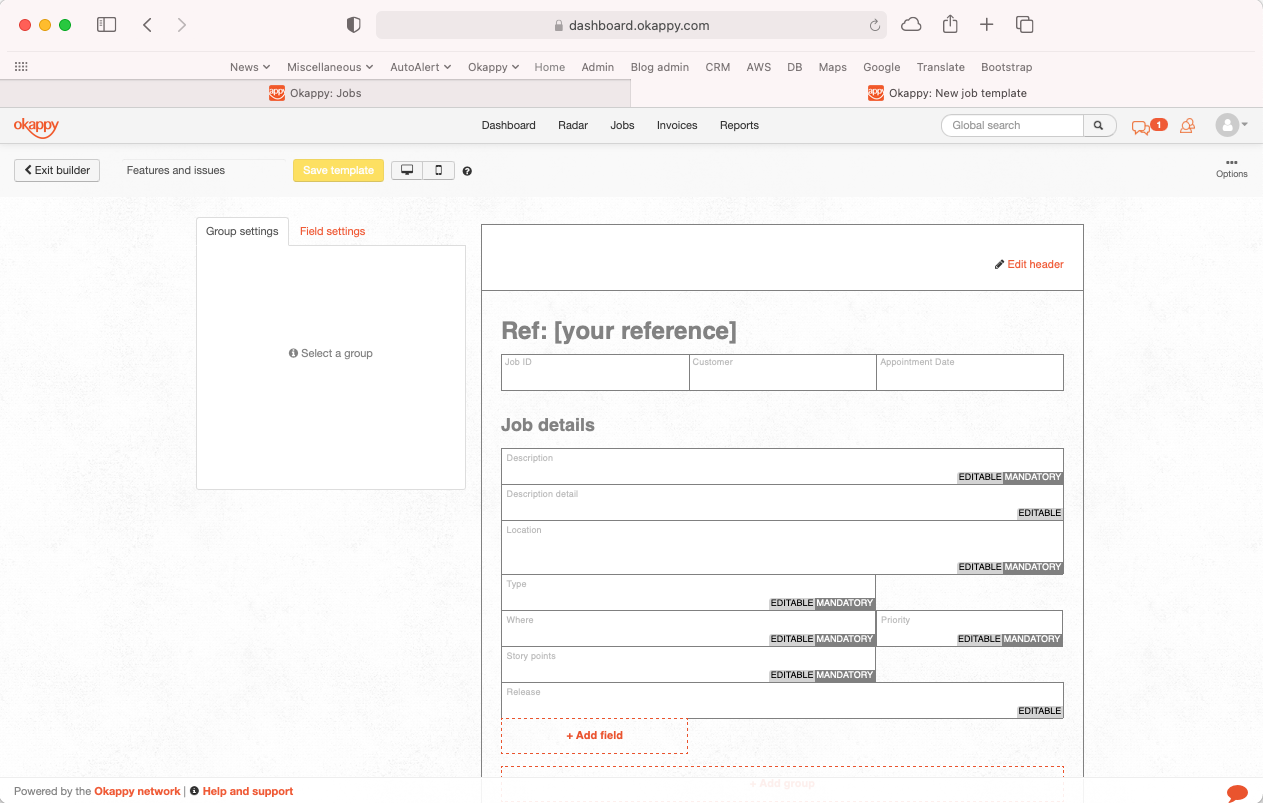
How to create job templates
To create a template
- Click job options from within the job’s dashboard.
- Select create new template
- You can then create a template scratch,
- copy an existing template including from our library templates, or
- purchase the configuration option in which case we’ll create the template for you.
The template builder is split into 4 key sections.
You’ve got the header and footer which will be on all the jobs done with that template
You’ve got the template settings which includes things like what information is automatically pulled into the invoice and when the different job dashboard alerts start to flash
Then you have the main job section which is typically filled out when adding the job and can include things like the contact’s name, address and job description
Finally, you can add check sheets at various stages of the job. When you’re engineers first look at the job, when they have done the work and once the job has been complete.
There’s also lots of help and support including a step-by-step video on our support site > jobs > creating customer job templates.
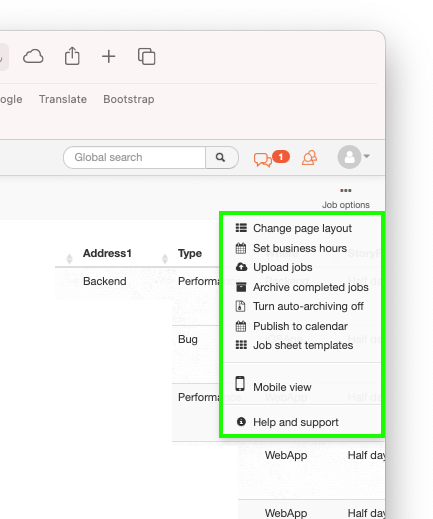
Job templates builder
The template builder is split into 4 key sections.
- The header and footer which will be on all the jobs done with that template
- Template settings which includes things like what information is automatically pulled into the invoice and when the different job dashboard alerts start to flash
- The main job section which is typically filled out when adding the job and can include things like the contact’s name, address and job description
- Check sheets which can be added at various stages of the job. When your engineers first look at the job, when they have done the work and once the job has been complete.
3) Adding files, images, videos etc.
Our final top tip is about adding images, files and other attachments on Okappy
A lot of you will know that you add images, photos, videos, documents and signature to a job. This is used more and more to demonstrate to customers what has been done and provide information for future work.
It means the files are easily accessible and all in one place rather than having search through WhatsApp, email etc.
They are available in real-time so the office can see the files as soon as they’ve been updated, likewise the engineer can view the files from their phone or tablet.
Images can be added from the office or by your engineers out in the field.
They are available to everyone in real-time.
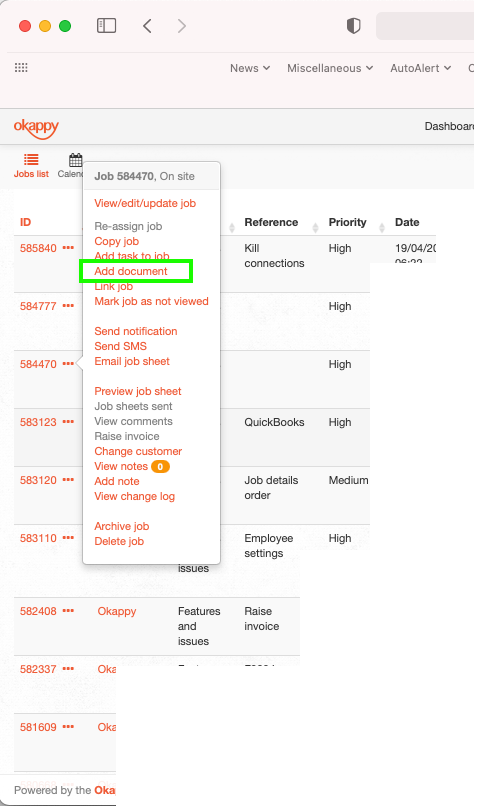
Add documents to a job
From the web
- To add documents to a job, simply click the three dots next to the relevant job
- A new window will be shown. You can drag and drop your file into that window or locate the file on your computer.
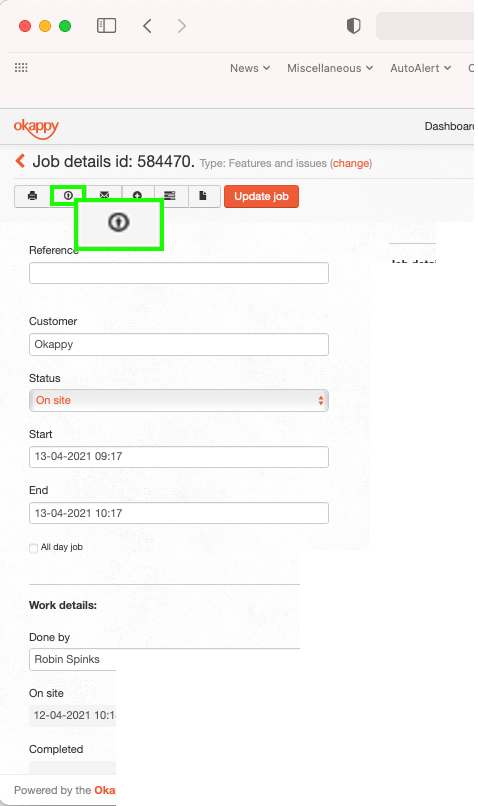
- You can also add a file from within a job. To do that click the upload file icon towards the top left of the screen.
- Then you can again either drag and drop your file or locate it
From within a job
- To add documents to a job, simply click the three dots next to the relevant job
- A new window will be shown. You can drag and drop your file into that window or locate the file on your computer.
- You can also add a file from within a job. To do that click the upload file icon towards the top left of the screen.
- Then you can again either drag and drop your file or locate it
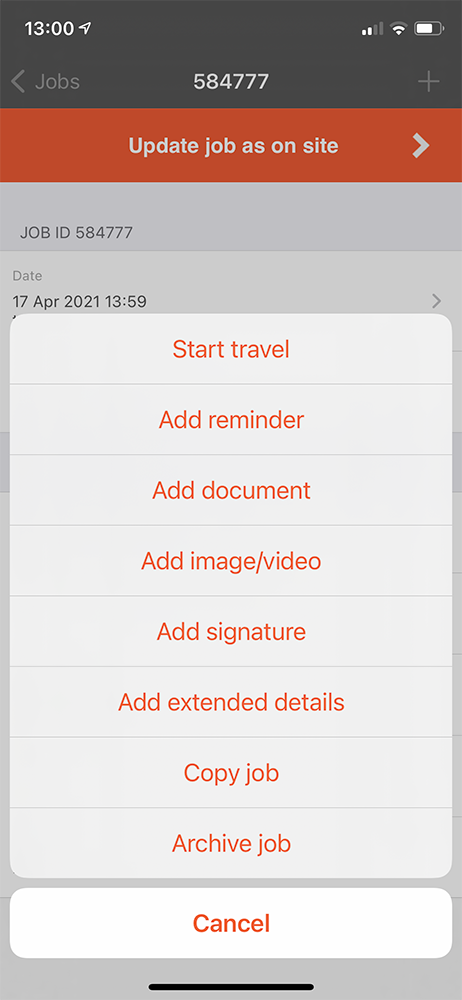
Add a document from iOS
Your engineers can also add documents, files and images to a job when they are out and about. To do that,
- Select the job
- Click the plus icon
- Select Add document or Add photo.
You also have control over how the image is uploaded, Either in the background which allows you to carry on editing work or in line.
One thing to note that if you do upload the file in the background, if you close the app then how the image gets uploaded will depend on the phone rather than our app. Apple restricts uploads say if the battery is low or if the network is poor.
Adding documents on Android
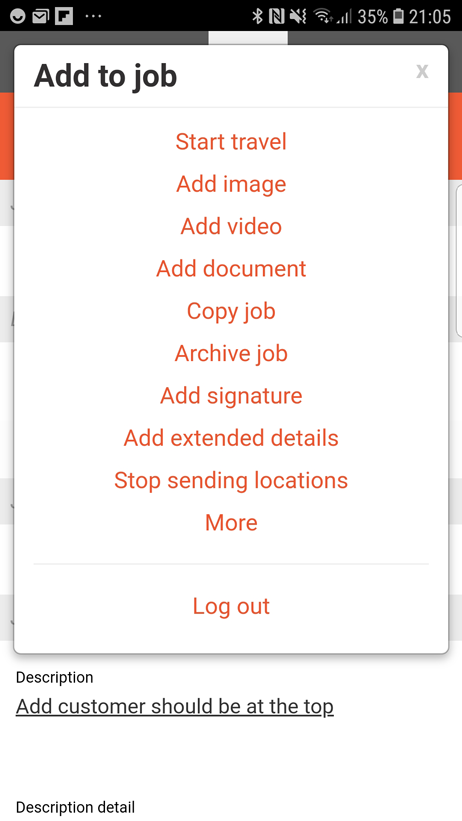
Android is like iOS apart from a few subtle differences. To upload a job on Android
- Again, select the job
- Click the Okappy icon this time
- Select Add document or Add photo.
Copying jobs with documents
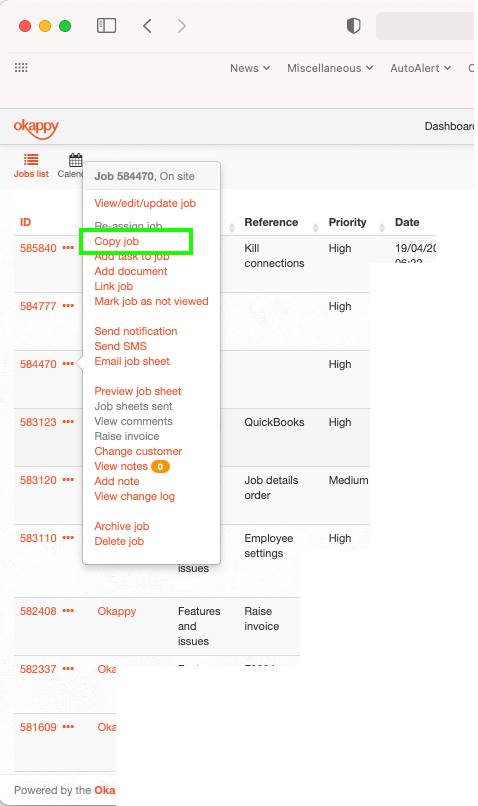
Once you have a document or attachment on a job. You can also copy the attachments when you’re copying the job. That makes it really easy to have a job which always has a specific document i..e, a RAMS doc
To do that, copy the job and ensure the Copy any attachments icon is selected.
Copying jobs with documents on iOS
Likewise on the mobile app to copy a job and any attachments
- Click the Plus icon
- Select Copy job
- Update the details
- Turn the Copy any attachments switch to on

Copying jobs with documents on Android
Likewise on the mobile app to copy a job and any attachments
- Click the Okappy icon
- Select Copy job
- Update the details
- Turn the Copy any attachments switch to on

Adding documents to a customers record
You can also add documents to invoices and to your customers, subcontractors and employees.
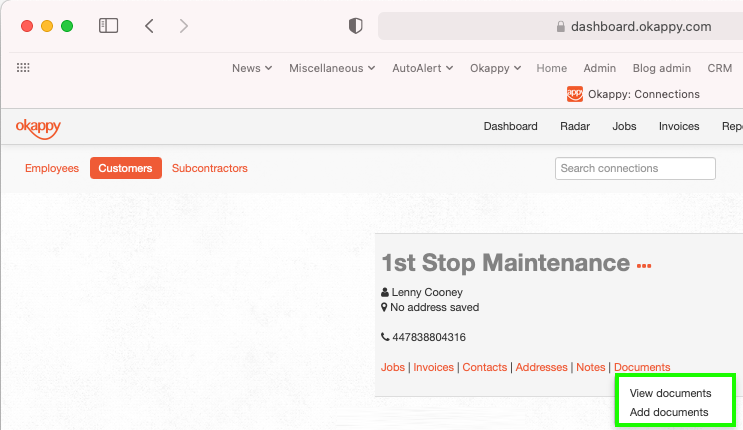
To add a document to your customer.
- Go to the Connections screen
- Select Customer
- Find the relevant customer
- Click the Documents link
- Click Add documents.
You can also view any documents for that customer from the same link
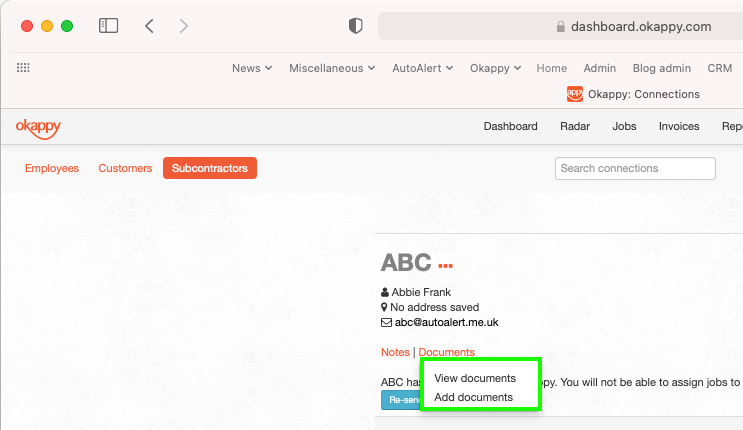
Adding documents to a subcontractors record
You can also add documents to invoices and to your customers, subcontractors and employees.
To add a document to your customer.
- Go to the Connections screen
- Select Subcontractor
- Find the relevant subcontractor
- Click the Documents link
- Click Add documents.
You can also view any documents for that subcontractor from the same link
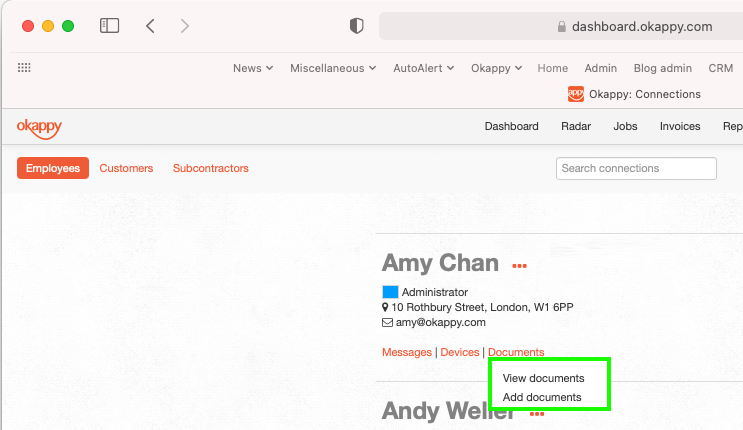
Adding documents to an employee record
You can also add documents to invoices and to your customers, subcontractors and employees.
To add a document to your customer.
- Go to the Connections screen
- Select Employees
- Find the relevant employee
- Click the Documents link
- Click Add documents.
You can also view any documents for that employee from the same link
Further help and support
- https://www.okappy.com/support-article/information-visibility
- https://www.okappy.com/support-article/employees-or-subcontractors-what-is-the-difference
View the webinar
Get the webinar slides
Leave your details above and we’ll send out a copy of the slides. We’re also interested to hear of any other topics you may like to hear about for future webinars.
The post Webinar – Top things you didn’t know about Okappy appeared first on Okappy.
]]>