The post Adding documents for a subcontractor appeared first on Okappy.
]]>Adding documents for a subcontractor
If you have lots of subcontractors, it’s often important to maintain documents such as certificates, plans or other files in one place which is secure and easily accessible.
With Okappy all your information is available at the touch of a button. You can add documents, attachments and images to jobs and then quickly retrieve them when required. Likewise you can store documents and attachments with each employees record.
Read on to find out how to add and view documents or attachments for your subcontractors.
Adding a document or attachment for your subcontractor
To add a document or attachment when logged into Okappy.
- Go to the connections screen by clicking the Connections icon (
 ) at the top right of the screen
 - Select Subcontractors
- Find your subcontractor
- Click Add document
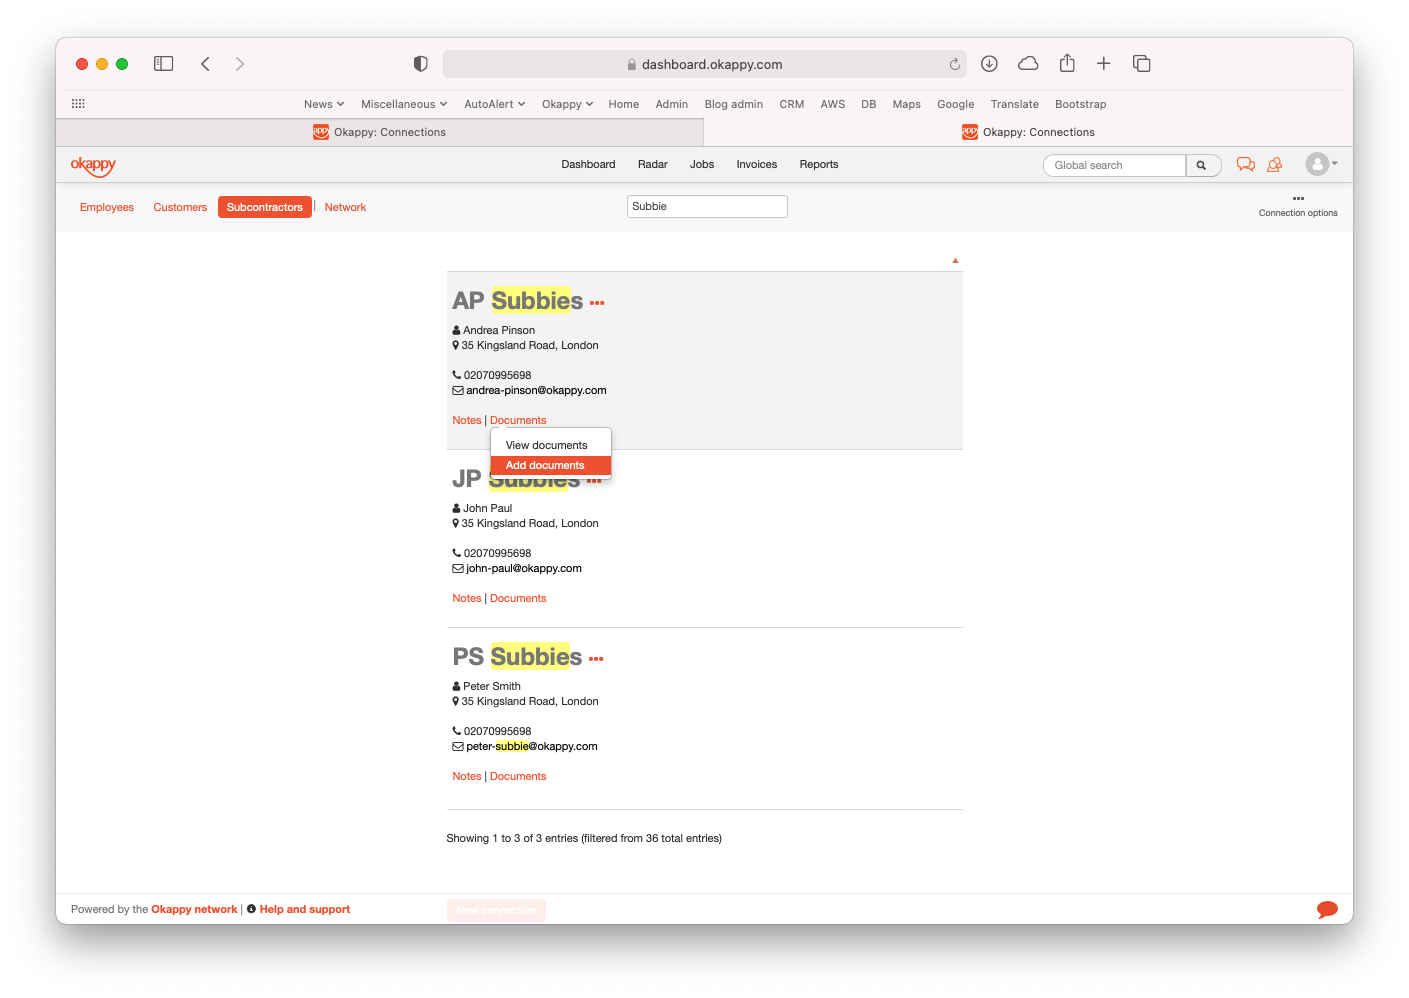
Click Browse or drag and drop your document or attachment into the Add file window

Your document or attachment will be added to your subcontractor’s record.
Viewing subcontractor documents from the subcontractors connections screen
To view documents which you’ve previously added for a subcontractor,
- go to the Connections screen,
- select Subcontractors.
- Find your subcontractor, and then
- click View documents


Click the filename to view the document or right click and then save as to save it down to your computer.
Viewing the subcontractor documents report
Alternatively, you can use the reports screen to view the Subcontractors documents report.
To view your customer documents report,
- Click Reports
- Select Other
- Click Subcontractor documents
- Choose your subcontractor
- Click Generate report

Your subcontractor documents will be displayed.

Click the filename to view the document or right click and then save as to save the document or attachment down to your computer.
Further information
To find out about other reports available within Okappy, check out our reports help and support pages.
The post Adding documents for a subcontractor appeared first on Okappy.
]]>The post Adding documents for a customer appeared first on Okappy.
]]>Adding and storing documents for a customer
If you have lots of customers, it’s often important to maintain documents such as certificates, plans or other files in one place which is secure and easily accessible.
With Okappy all your information is available at the touch of a button. You can add documents, attachments and images to jobs and then quickly retrieve them when required. Likewise you can store documents and attachments with each employees record.
Read on to find out how to add and view documents or attachments for your customers.
Adding a document or attachment for your customers
To add a document or attachment when logged into Okappy.
- Go to the connections screen by clicking the Connections icon (
 ) at the top right of the screen
 - Select Customers
- Find your customer
- Click Add document

Click Browse or drag and drop your document or attachment into the Add file window

Your document or attachment will be added to your customer’s record.
Viewing customer documents from the customer connections screen
To view documents which you’ve previously added for a customer,
- go to the Connections screen,
- select Customers.
- Find your customer, and then
- click View documents


Click the filename to view the document or right click and then save as to save it down to your computer.
Viewing the customer documents report
Alternatively, you can use the reports screen to view the Customer documents report.
To view your customer documents report,
- Click Reports
- Select Other
- Click Customer documents
- Choose your customer
- Click Generate report

Your customer documents will be displayed.

Click the filename to view the document or right click and then save as to save the document or attachment down to your computer.
Further information
To find out about other reports available within Okappy, check out our reports help and support pages.
The post Adding documents for a customer appeared first on Okappy.
]]>The post Authorising a connection request appeared first on Okappy.
]]>Authorising a connection request
With Okappy you can connect to your customers and subcontractors. Send and receive work and share the status of that work as it’s updated in real-time by your engineer
In order to send or receive work you need to authorise the connection.You can do this by clicking the Accept invitation button on the invite email you should have received.
If you haven’t received the email (check the email address or spam folders), then you can also authorise the connection when logged into Okappy.
Read on to find out how to authorise a connection when logged into Okappy.
Authorising connection requests on the web
To authorise a connection when logged into Okappy on the web.
- Click the Connections icon towards the top right of the screen
- If the request was from a customer, then choose Customers.
- If the request was from a subcontractor, choose Subcontractors
- Find the relevant company using the filter
- Click the Authorise button

Once authorised, customers can assign jobs to subcontractors.
Authorising connection requests from the mobile app
To authorise a connection from the iOS or Android app
- Click the Messages icon
- Click the + Plus icon on iOS, or the Okappy icon on Android
- View Customers or Subcontractors depending on who has sent the invite
- Find the company
- Click Authorise

Once authorised, customers can assign jobs to subcontractors.
For further information
For further information search in our support pages or forum
The post Authorising a connection request appeared first on Okappy.
]]>The post View subcontractor connection details appeared first on Okappy.
]]>Viewing and editing subcontractor connection details
Your subcontractor connections database is available from the connections screen. Read on for a quick overview of the functions and information available for each of your subcontractor connections.
Viewing subcontractor connection details
To view your subcontractor connection details, click the connections icon ![]() from anywhere within the web app and then choose Subcontractors.
from anywhere within the web app and then choose Subcontractors.

Finding a subcontractor connection
From within the subcontractor screen, quickly find your subcontractor by entering any part of their details in the smart filter.

Editing subcontractor details
To edit your subcontractor’s details, click the three dots icon next to the relevant subcontractor to bring up the Subcontractor actions menu.

From there you can
- Send login details to a contact at the subcontractor
- Change details if the subcontractor is not using Okappy, or request a change if they are
- Change how the subcontractor is recognised in your account settings
- Convert the connection from a subcontractor to a customer
- Delete the subcontractor connection
Additional options
Quick links are available for each of your subcontractors. This provides access to:
- Subcontractor notes
- Documents
View and add subcontractor notes
Click the Notes quick link to view notes for that subcontractor connection and add new notes.

View and add documents for a subcontractor
Click the Documents quick link to view documents for that subcontractor connection and add new documents.

For further information
For further information search in our support pages or forum
The post View subcontractor connection details appeared first on Okappy.
]]>The post Viewing customer connection details appeared first on Okappy.
]]>Viewing and editing customer connection details
Your customer connections database is available from the connections screen. Read on for a quick overview of the functions and information available for each of your customer connections.
Viewing customer connection details
To view your customer connection details, click the connections icon ![]() from anywhere within the web app and then choose Customers.
from anywhere within the web app and then choose Customers.

Finding a customer connection
From within the customer screen, quickly find your customer by entering any part of their details in the smart filter.

Editing customer details
To edit your customer’s details, click the three dots icon next to the relevant customer to bring up the Customer actions menu.

From there you can
- Send login details to a contact at the customer
- Change details if the customer is not using Okappy, or request a change if they are
- Change how the customer is recognised in your account settings
- Set whether the pay button is shown on your invoices to your customer
- Convert the connection from a customer to a subcontractor
- Delete the customer connection
Additional options
Quick links are available for each of your customers. This provides access to:
- Jobs reports for the customer
- Invoices for the customer
- Customer contacts
- Site addresses
- Customer notes
- Documents
View contacts / add contacts
Click the Contacts quick link to view contacts at that customer connection and add new contacts.

View customer addresses
Click the Addresses quick link to view addresses for your customer connection and add new address.
You can add one address at a time or multiple addresses using the upload functionality.

View and add customer notes
Click the Notes quick link to view notes for that customer connection and add new notes.

View and add documents for a customer
Click the Documents quick link to view documents for that customer connection and add new documents.

For further information
For further information search in our support pages or forum
The post Viewing customer connection details appeared first on Okappy.
]]>The post Viewing and editing employee details appeared first on Okappy.
]]>Viewing and editing employee details
Your employee database is available from the connections screen. Read on for a quick overview of the functions and information available for each of your employees (including your own details)
Viewing employee details
To view your employee details, click the connections icon ![]() from anywhere within the web app and then choose Employees.
from anywhere within the web app and then choose Employees.
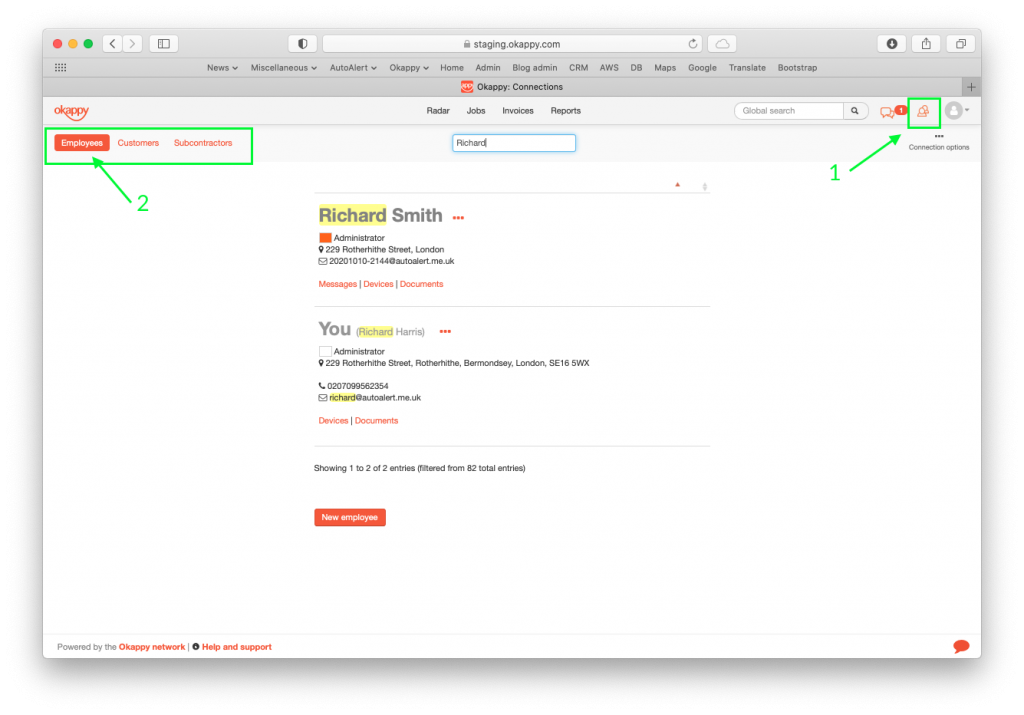
Finding an employee
From within the employee screen, quickly find your employee by entering any part of their details in the smart filter.

Editing employee details
To edit your employee’s details, click the three dots icon next to the relevant employee to bring up the Employee actions menu.
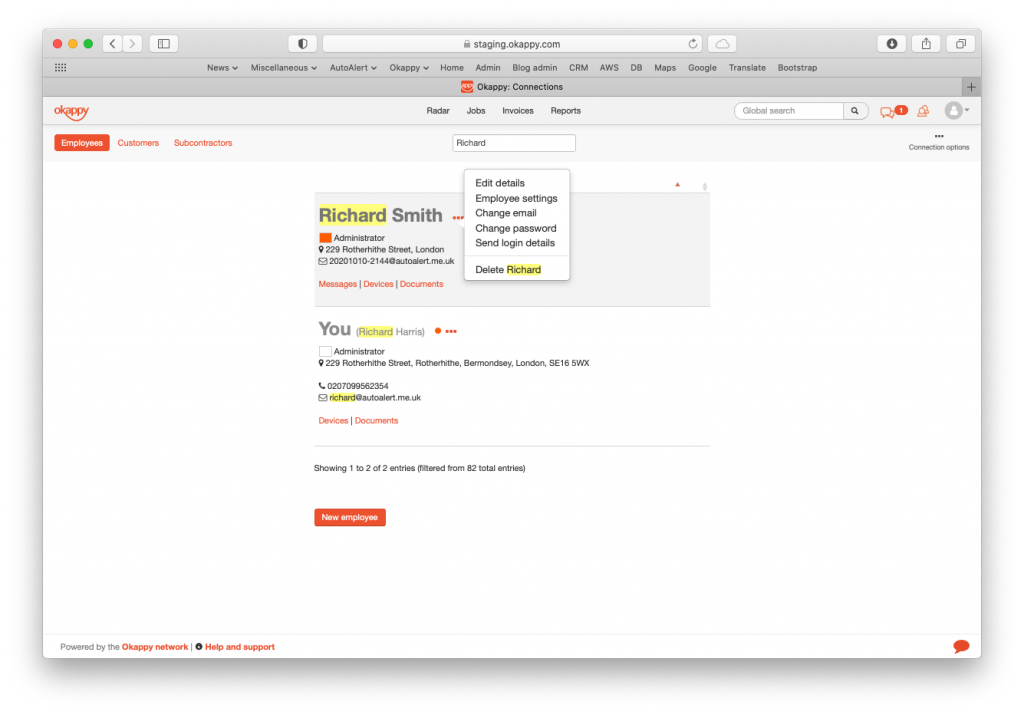
From there you can
- Edit your employee details such as name, address, contact telephone
- Update your employee settings including whether they are an admin or standard user, and what screens and functions are available to them
- Change their email
- Change their password or send a reset link so they can change it themselves
- Send their login details, or
- Delete the employee
Additional options
Quick links are available for each of your employees. This provides access to:
- Messaging screen. View and send messages with that employee
- Device report. Shows all the devices for your employees
- Documents
From the documents link, you can view any documents you have added for that employee or add more documents.

Viewing and editing your own details
Your own details will also be included in the employees connection tab. Simply search using your name or email. You can access your details and make changes as for any other employee.
For further information
For further information search in our support pages or forum
The post Viewing and editing employee details appeared first on Okappy.
]]>The post Accepting a connection invite appeared first on Okappy.
]]>I have received a connection invite. What now?
Okappy’s market network is transforming how the best companies are working together and managing their work.
By connecting on Okappy, you can receive work from your customers and assign the work to your own employees or subcontractors. Everyone is aware of the status of the job as its updated by the end engineer out in the field.
That means no more duplication between different system, less errors and ultimately more capacity to grow.
You’ve received an invitation from one of your connections. What do you do next? Read on to find out how to accept the invite and start benefiting from the Okappy network.
Open the connection invite
If you don’t already have an account, then the first step is to open the connection invite which you should have received from Okappy.

Note: If you haven’t received an invite or it is not displaying correctly, please check the following
- That your connection has used the correct email
- The invite is not in your spam or junk folder
- You can receive emails, i.e., your inbox is not full
- That you can view images and other html formatting
Accept the connection invite (on your desktop)
Click the Accept invitation button
The following page will be opened in your browser

Important: Make a note of the temporary password shown in the welcome page.
Click Get started to view your jobs screen and start updating jobs or check out the Quick tutorial
At this stage, it is also worth changing your temporary password by
- clicking the Profile icon towards the top right of the screen
- click Change password
- enter the temporary password you noted above and your new password
- confirm your new password, and
- click the Change password button
Accept the connection invite (on your mobile)
Click the Accept invitation button
Providing you haven’t already installed the Okappy app, then you will see the following page in your mobile browser

Important: Make a note of the temporary password which is shown in the welcome page
Download the Okappy app
Click the Download app button to download the app from the Apple iTunes Store or Google Play store
Once downloaded,
- open the app
- swipe through any introductory screens
- click the Existing user login button

Login to Okappy
Enter your email and the temporary password which you noted above.
This will log you in to the app where you can start receiving and updating your jobs.
At this stage, it is worth resetting your password which you can do by
- clicking on the Okappy icon from within the app
- click More
- click Login details
- enter a new password, and
- click Update login details
For more information see resetting your password.
The post Accepting a connection invite appeared first on Okappy.
]]>The post Reassign jobs appeared first on Okappy.
]]>Reassigning jobs
Some customers assign jobs to their engineers or subcontractors as soon as the job comes in. Others leave them as not assigned initially and then batch assign jobs at the start of the day or week.
Whichever way you do it is up to you, but what if you want to re-assign a job which is currently not assigned or assigned to the wrong engineer. Read on to find out how to re-assign your jobs.
Re-assign a job from the web dashboard
To reassign a job from the web dashboard, simply click the pencil icon next to the name of assignee on the relevant job.

The re-assign window will be shown.
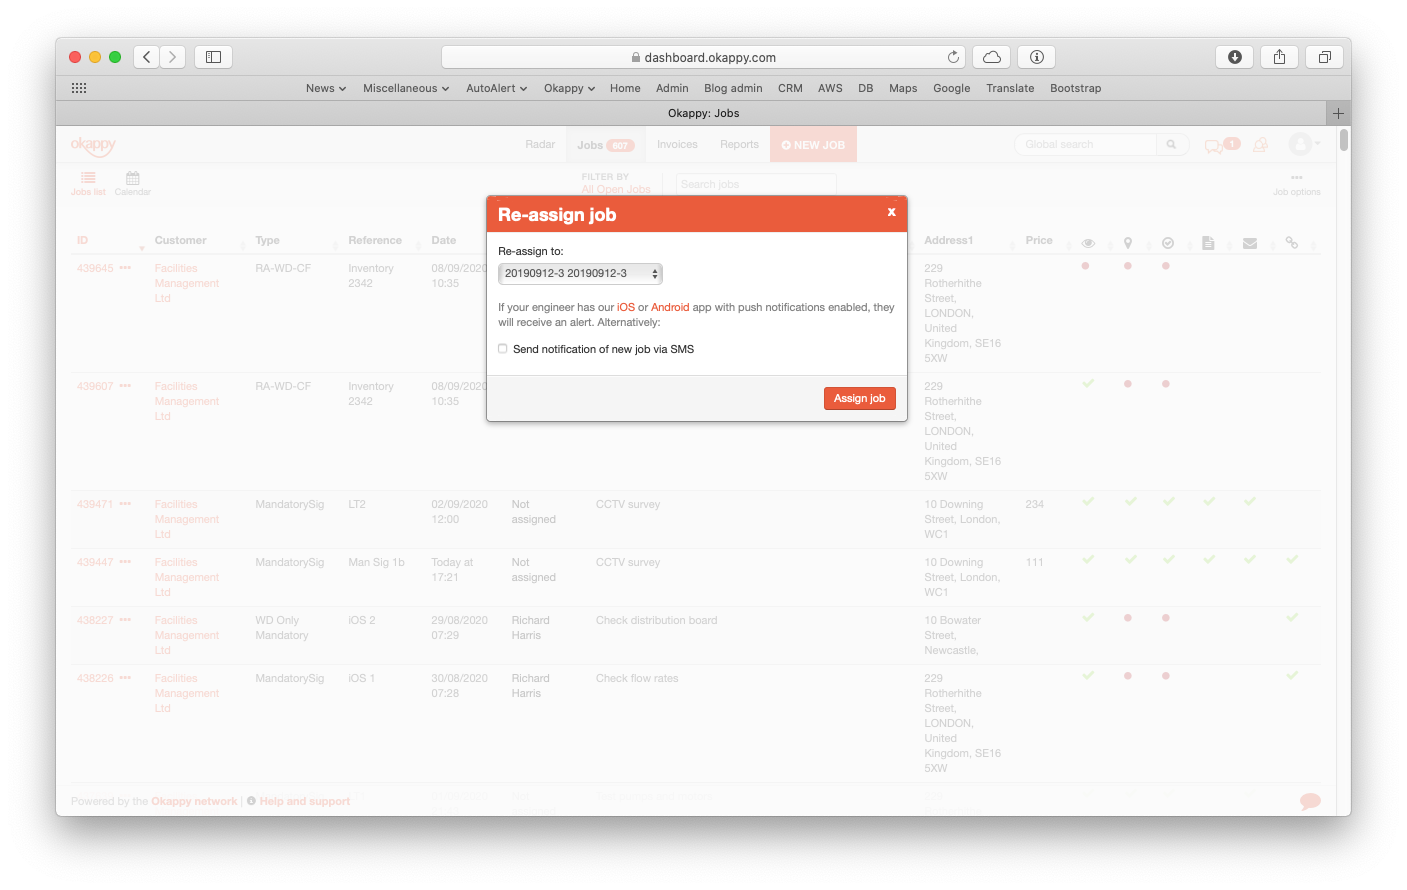
Select who you want to assign your job to (employees are at the top of the list, subcontractors at the bottom).
A push notification will be sent to the original employee or subcontractor (if relevant) and to the new engineer advising that the job has been re-assigned.
You can also send a text message to the new engineer by click the Send notification of new job via SMS checkbox.
Click the Assign job button.
Your job will be assigned and notifications sent.
Re-assigning a job from your mobile device
If you are an administrator, you can view all jobs and re-assign them.
To re-assign a job,
- click into the job
- Scroll down
- Click the assigned cell

Note: The cell will either say Not assigned, or Assigned to [name of employee or subcontractor]
Select the employee or subcontractor that would like to assign the job to
The job will be re-assigned.
For further information
For further information search in our support pages or forum
The post Reassign jobs appeared first on Okappy.
]]>The post Deleting connection details appeared first on Okappy.
]]>Deleting a connection’s personal details
With the GDPR regulations, you might receive a request to remove the personal details of one of your connections, typically a domestic / individual customer.
To remove their details, follow the steps below
Changing customer details
From within the Okappy web app,
- click the Connections icon towards the top right of the page,
- click View connections.

- Select Customers.
- Enter your customers name or email in the filter
- Click View or edit contacts.

- Click the Edit email icon

- Change the email to a non personal email i..e, ddmmyyyy@dummyemail.com
- Click the Change email button.

- Click Change customer details

- Remove or change any personal details, and
- click Update details
This will remove the personal details for that connection. Any jobs done for that connection will be automatically updated with the new details.
Changes requiring authorisation
If your connection is using Okappy, you can still make changes but they will need to be authorised by your connection.
To change your connection’s details, follow the steps above.
You will see an alert saying that This connection is using Okappy. Changes require authorising.

Make the changes and then click the Request change button.
Your connection will be notified. Once the request has been approved, the details will be updated.
Removing a connection
Alternatively, you may prefer to remove the connection altogether.
To remove the connection,
- find the connection using the steps above, and then
- click Delete connection

Your connection will be deleted.
The post Deleting connection details appeared first on Okappy.
]]>The post Deleting an employee appeared first on Okappy.
]]>Deleting an employee
If you have an employee that has left and you want to delete them from Okappy. This can be done from the Connections screen.
Follow these steps to delete an employee when logged into Okappy on the web
- Click the Connections icon towards the top right of the screen
- Choose View connections
- Choose Employees
- Find the employee you want to remove
- Clicl the three dots menu next to the employee name
- Select Delete [employee name]
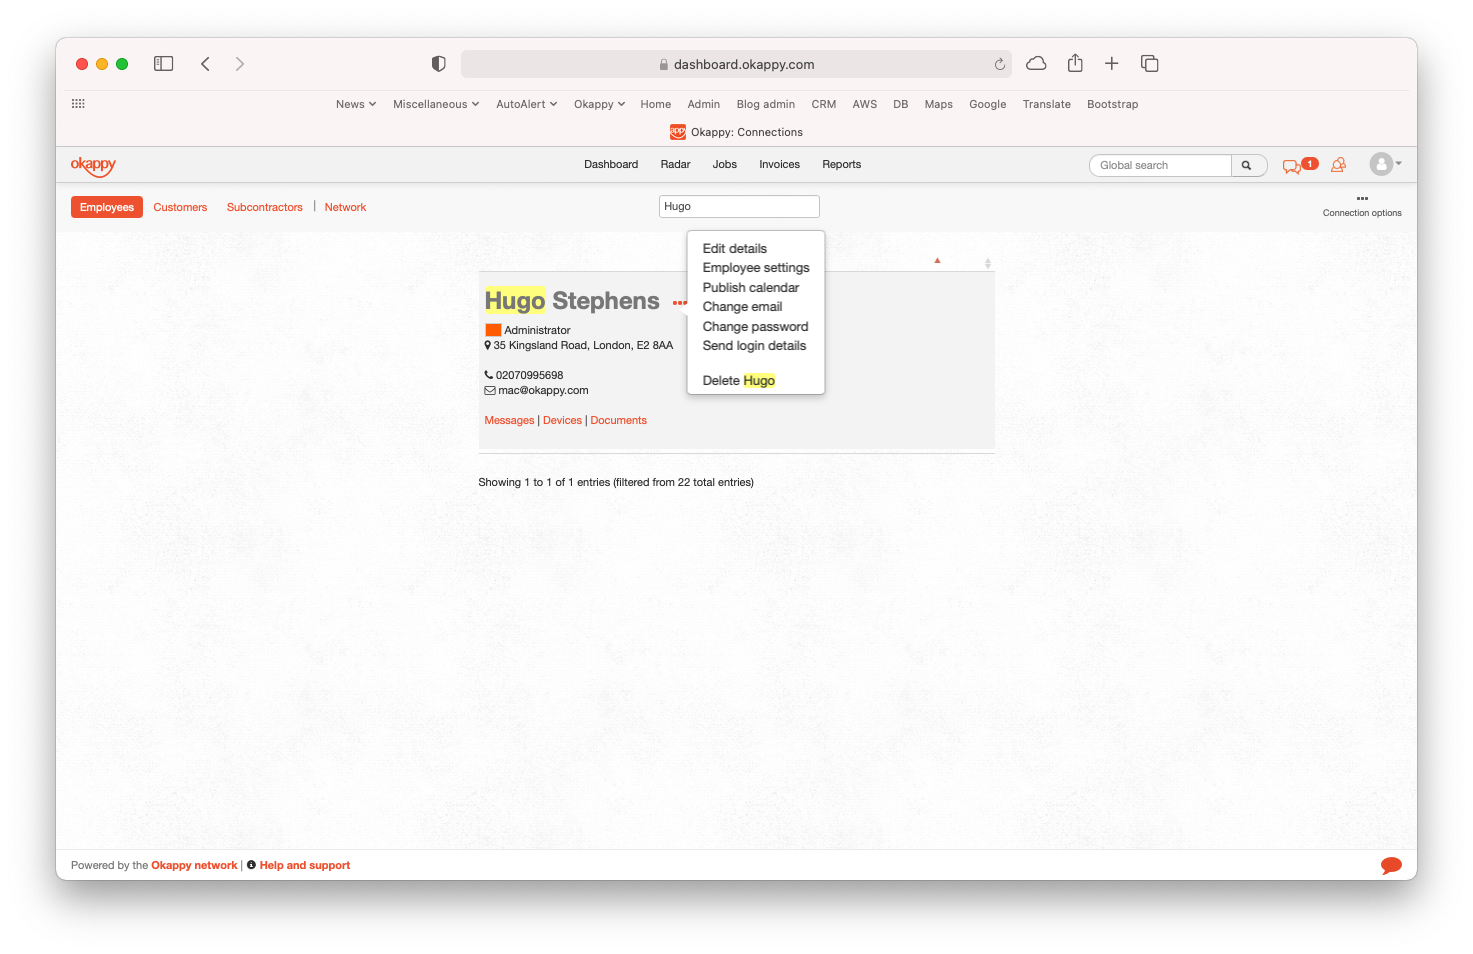
A confirmation window will be shown with a link to a report showing the jobs done by that employee.

Notes:
- Historical job information will still be available for jobs done by a deleted employee, but the job will be shown as Not assigned. (see below)
- Devices linked to that employee will not show on the radar screen.
- Subscriptions will be recalculated automatically. 14 days notice is required before the change will take affect.
If you still want to delete the employee, click Delete [employee name]
The employee will be deleted, your subscription will be updated and the following confirmation will be shown.

If you realise you have deleted the employee in error, then click the undo link in the confirmation alert to put the employee back into your account.
Historical job details changes
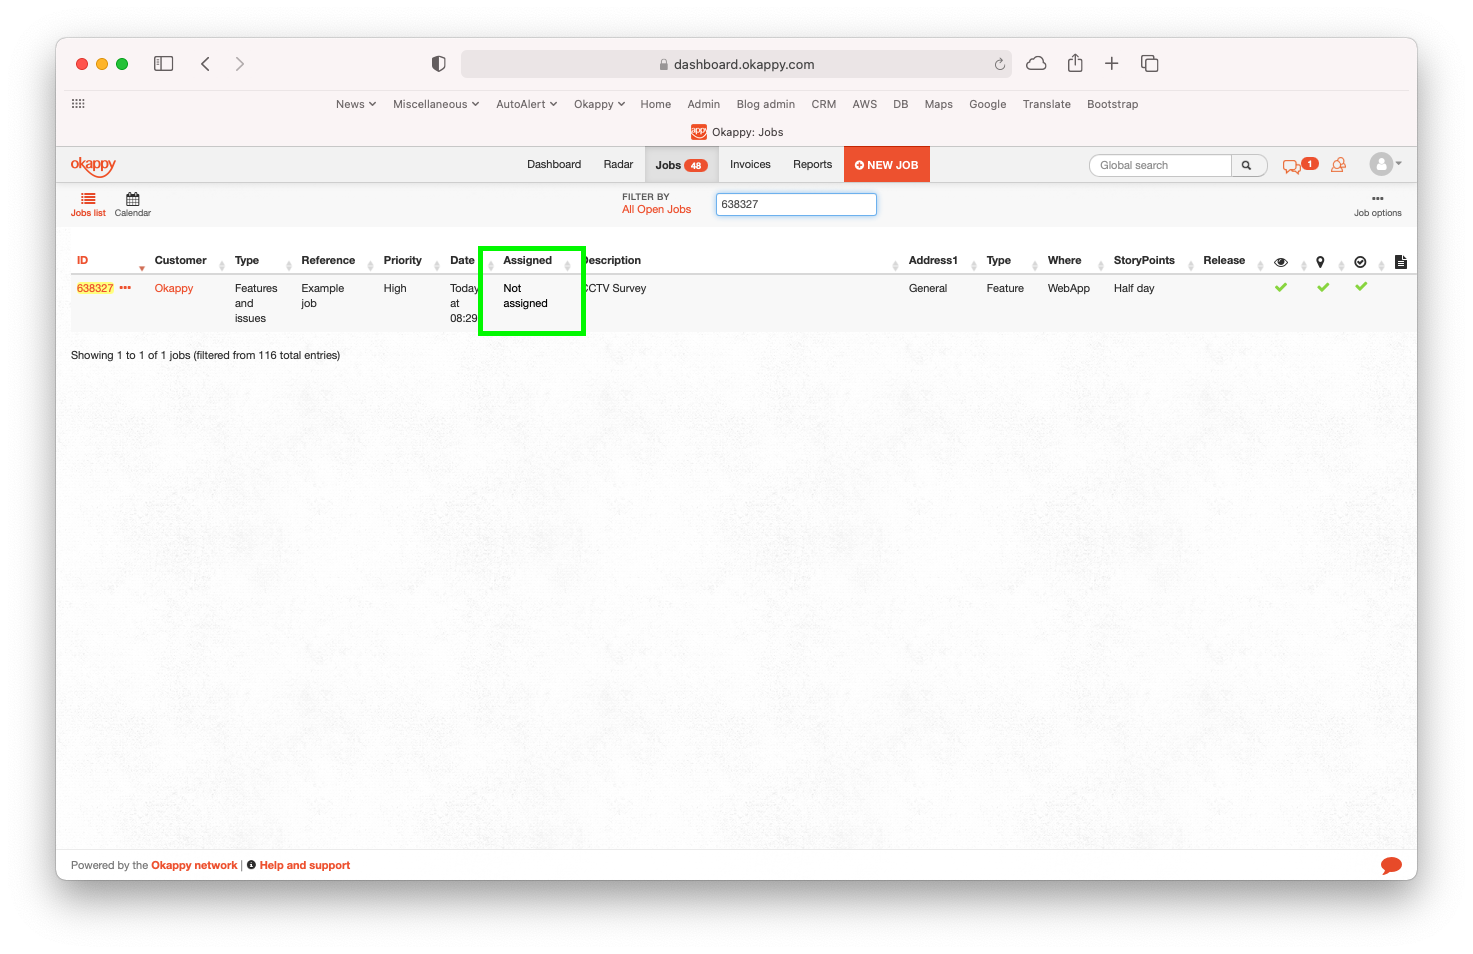
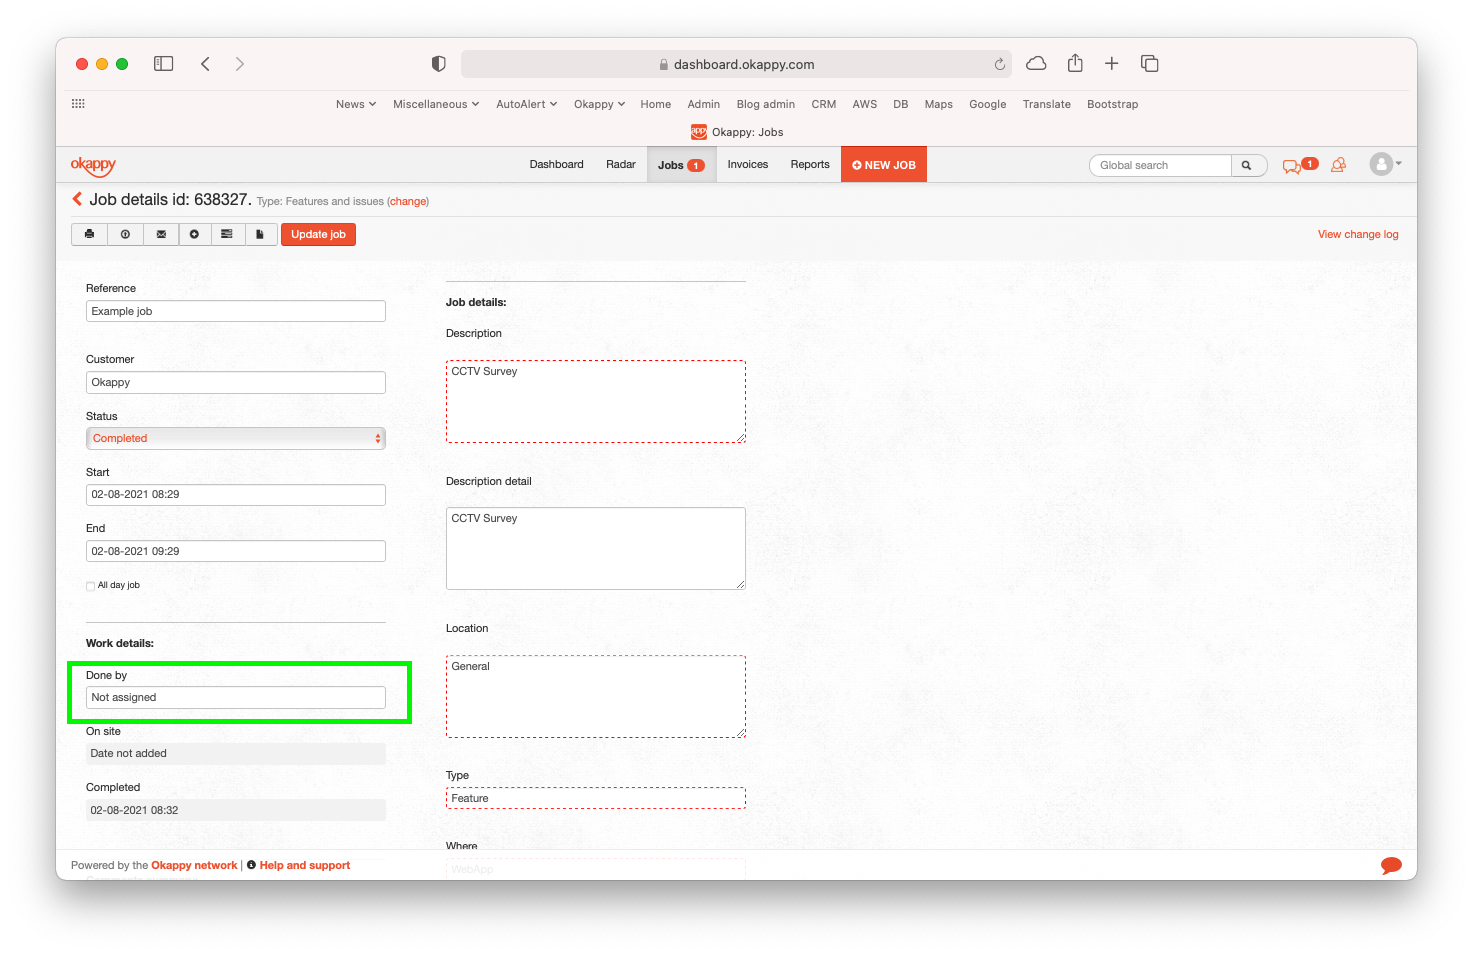
When an employee is deleted, all jobs that were originally assigned to that employee will revert to Not assigned. All other job details will remain unchanged.
The post Deleting an employee appeared first on Okappy.
]]>