The post Taking a screenshot appeared first on Okappy.
]]>Taking a screenshot
Taking a screenshot is useful for a number of different reasons, but particularly when requesting help and support.
There are often various ways that actions can be completed on Okappy. Sending a screenshot helps provide valuable context such as the browser, device and screen you are looking at.
Read on to find out how to take a screenshot on different devices
You can take a screenshot on an Apple Mac in a couple of different ways.
Take a screenshot of part of a screen
To take a screenshot of part of the screen, click Shift, CMD 4. Then drag the cursor to select the part of the screen you want to capture. As soon as you let go, an image will be saved (normally to your desktop).
Take a screenshot of a particular window
To take a screenshot of a window, click Shift, CMD 4 and then space. Then click the mouse to capture the screen.
To capture a screenshot
To take a screenshot on Windows 10, simply click the Print screen key. This will save an images to your pictures folder
To take a screenshot on your iOS device
On an iPhoneX and above, hold down the Side button and the volume up button. This will save an image to your pictures folder.
On iOS devices with a home button, click the Side button and the home button to save a screenshot.
To take a screenshot on your Android device
Press and hold the power and volume buttons.
Recording the screen
Read on to find out how to record your screen on your Mac, Windows, iOS or Android devices.
Capture a screen recording
To record the screen,
- click Shift, CMD, 5
- A menu bar will be shown which has the following three options for screen capture
- Capture entire scren
- Capture selected window
- Capture selected portion
- And the following two options for screen recording
- Record entire screen
- Record selected portion
- Choose Record entire screen
- Click Record
The screen will start recording and you will get a record button in the top menu bar.
Once you have finished recording, click the record button in the menu bar to finish recording. The recording will be saved to your desktop
For older version of Mac OSX.
If the above option is not available. You can still record the screen using QuickTime Player.
- Open QuickTime player
- The file window will open
- Click Cancel
- In the QuickTime menu bar at the top of the screen, click File
- Click New Screen Recording
- Select the screen to record
- Click Record
To record the screen
Windows 10 has a built in tool called Game Bar to help record your screen.
Game Bar does require the right type of graphics card, otherwise you may receive an error telling you that your PC doesn’t meet the hardware requirement for recording clips.
First make sure Game Bar is enabled from Settings > Gaming > Record game clips
Then to record your screen, click WIN G
Click the Start recording button to capture your screen. You can also get to this quickly by click WIN ALT R
To stop the recording, click the Recording button on the floating bar. A notification appears telling you that the game clip was recorded.
Click the notification, and File Explorer opens to the specified location.
To record the screen
To record the screen on your iOS device, first add the record button to the control centre from Settings > Control Centre > Customise Controls, then tap next to Screen Recording.
You can then
- open the control centre
- click the record button to start recording.
- Once you have finished click the red icon in the top left of the screen.
- Click Stop in the alert
The screen recording will be saved to Photos.
To record the screen
On older versions of Android, there was no built in functionality to record the screen so you would need to download an app.
You access the Screen Recorder feature from the Quick Settings panel in the notification shade.
Out of the box, the screen recorder button isn’t there, so the first thing you must do is add the Screen Recorder button. To do this, drag down the notification shade twice until you see the Quick Settings panel (Figure A).
Tap the pencil icon in the bottom-left corner. This will open the Quick Settings editor, where you can customize the panel. Locate the Screen Recorder icon and drag it from the bottom to the top. Once you’ve placed the icon where you want it in the panel, tap the left-pointing arrow to back out of the editor.
To record the screen,
- Drag down the notification panel twice to reveal the Quick settings
- Tap the screen recorder icon
- When you’ve finished, pull down the notification panel and tap the red screen record card to end the recording.
A movie will be saved to photos
The post Taking a screenshot appeared first on Okappy.
]]>The post Searching for information appeared first on Okappy.
]]>Searching for information
Finding key information quickly is one of the things that differentiates Okappy from other software. With other systems you may have to search through lots of different pages or even through different applications.
With Okappy, all your information is available with a minimum number of clicks.
Read on to find out how to get find information quickly and easily using the smart filters or global search.
Using the smart filters
Smart filters are available throughout Okappy. You can use them to quickly search in your jobs screen, through your invoices, connections or in a generated report.
Start typing part of a word to quickly filter down to the relevant jobs or invoice etc which contain that word. You could try with a postcode, name or telephone number or any part of the description.
Smart filters are available in the following screens
- jobs dashboard
- invoices
- connections
- reports
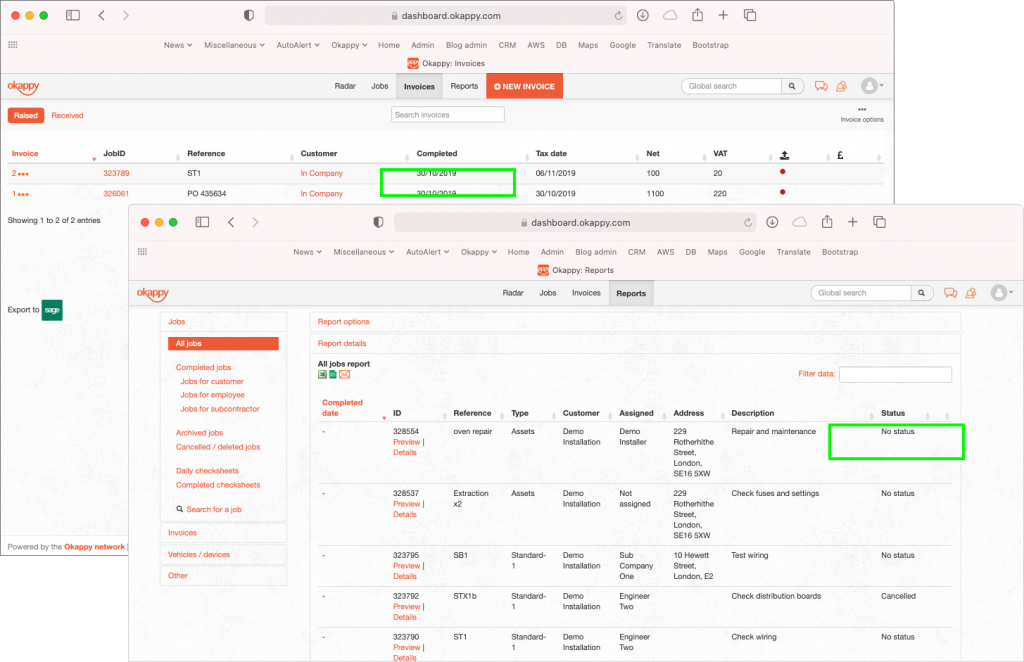
Using the global search
Global search is also available throughout the app. Simply enter a word in the global search bar and click the magnifying glass to start searching.
The window will show the relevant results depending on what screen you are currently in. If you are in the jobs dashboard, the first results shown will be for any relevant jobs.

From there, you can also search other areas such as related invoices

You can search your Customers, or search support articles

For further information
For further information search in our support pages or forum
The post Searching for information appeared first on Okappy.
]]>The post Information visibility appeared first on Okappy.
]]>Information visibility over the network
Okappy’s B2B connection workforce management platform is unique in that you can connect to your customers, employees AND subcontractors. Send and receive jobs and see the status of those jobs as they’re updated in real-time by your engineer out in the field.
But what if you don’t want all your information to be shared?
We respect that you may have certain details that you won’t want to disclose to everyone. So that you don’t have to worry about giving away any of your trade secrets, the view that your customers and subcontractors can see isn’t exactly the same as the details you see.
Who can see what?
![]() Your employee or subcontractor is private
Your employee or subcontractor is private
Whether you have assigned the job to one of your own employees or to one of your subcontractors, your customer will only see your company name in the assigned to field.
![]() Your customer is private
Your customer is private
Likewise, if you assign a job to a subcontractor, that subcontractor will not be able to see who your customer is. They will see you as their customer in their dashboard.
![]() Your work is private.
Your work is private.
Your customers can only see the work that you are doing for them. They cannot your other jobs. Likewise your subcontractors can only see the work you have assigned to them. They cannot see your other jobs.
Here’s an example of one specific job from the job list when viewed by you or your customer.
Your view

Your connection’s view

The post Information visibility appeared first on Okappy.
]]>The post Sending alerts to all your team appeared first on Okappy.
]]>Sending alerts to all your team
With Okappy you can add alerts which gets sent to all members of your team. To add alert follow these steps
When logged in the on web, from any screen,
- Click the Alerts icon towards towards the top right of the screen

- The messaging and alerts window will be shown

- Select Alerts if it is not already shown to see your latest alerts
- To add a new alert, click the +New alert button

- Enter your alert message
- Click the Send notification checkbox if you want a push notification to be sent to all registered devices

Receiving alerts on your mobile device
- If the send notification checkbox has been clicked, all registered devices for your employees will receive a push notification
- From within the app, click the Messages icon
- There will be a message from your company. Click that message to see all your company alerts

iOS alerts screen
The post Sending alerts to all your team appeared first on Okappy.
]]>The post Resetting your password appeared first on Okappy.
]]>Resetting your password
If you have forgotten your password, or if you want to change it periodically for security reasons, then you can do this easily from the web portal or via the Okappy mobile app.
For more information on resetting your password through the Okappy mobile app, check our support article.
This article is also available from within the mobile app by clicking the Okappy icon > More and then scrolling down to Help / Support.
Read on for our step by step guide on resetting your password
Forgotten password
If you’ve forgotten your password, you can reset it from the Okappy website. To reset your password,
- click the login button from anywhere on the Okappy website, and
- then click where it says “Don’t know or forgotten your details? Click here“.

- The reset password page will be shown

- Enter your registered email, and
- click the Reset button.
An email will be sent to your address with a link to reset your password.
If you haven’t received it, please check your spam or junk folders.
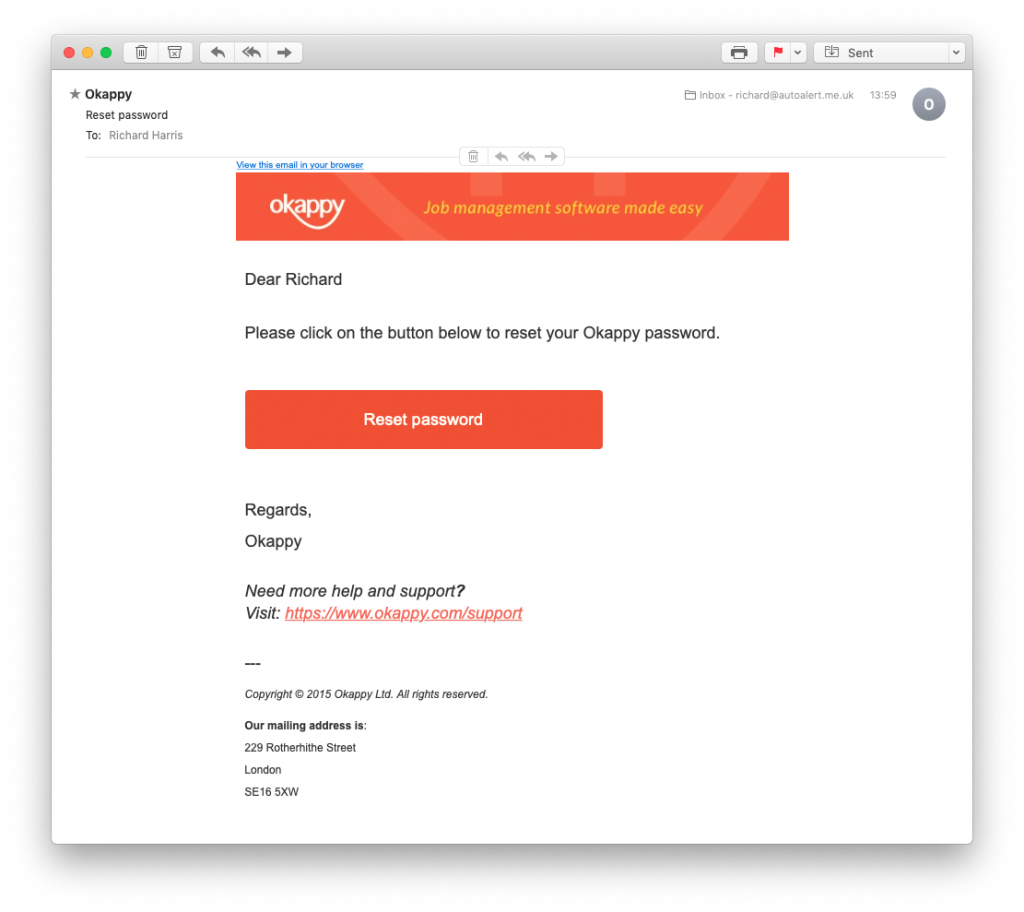
- Click on the Reset password button within the email
This will take you to your reset password page with your email already filled in.

- Enter a new password in the first password field
- Confirm the password by entering it again in the second field
- Click Reset
This will open the login page

- Enter your new password and
- click the Login button
Resetting your password when logged in
If you are already logged in to Okappy and want to change your password. You can do this easily by
- Clicking the Profile icon towards the top right of the page
- Click Change password
- Enter your old password
- Enter a new password
- Confirm the password, and
- Click Change password

Resetting an employees password
You can also reset the password on behalf of an employee. To reset their password from within Okappy
- Click the Connections icon
- Go to Employees
- Click New password

- A new password will be generated. You can either use this or create a password yourself
- Click the notify by email checkbox to send an email your employee
- Click New password

Alternatively, click the password reset link to send an email to your employee and they can reset the password themselves.
The post Resetting your password appeared first on Okappy.
]]>The post Uploading customer site addresses appeared first on Okappy.
]]>Uploading customer site addresses
With Okappy, you can upload multiple site addresses for your customers. Okappy learns from your previous jobs and suggests sites and address details with just a few clicks.
But, what if you already have a list of sites which you would like Okappy to know about.
You can now easily add a list of sites to your customers.
Follow the steps below to add a list of sites for your customer.
Uploading sites for a customer
To upload a list of sites for a customer from within the Okappy web portal,
- Go to the Connections screen
- Click View connections
- Select Customers (if not already selected)
- Find your customer
- Click Add addresses
- Drag and drop your spreadsheet containing your addresses or browse to the location where the spreadsheet is saved
- Click Done
Your addresses will be added to your customers.
When you next add a job for that customer, you can start typing any part of the address (minimum 3 characters) for a list of suggestions to be shown.
The post Uploading customer site addresses appeared first on Okappy.
]]>The post Ad hoc invoices report appeared first on Okappy.
]]>Ad hoc (search for invoices) report
With Okappy, your work information is available at the touch of a button. You can easily filter your invoices and search for particular invoices. You can also generate a report for all invoices containing a particular key word using the “Search for invoices” report.
To generate a report based off an invoice search, follow the steps below.
Generate your ad hoc (search for invoices) report
To generate a report of all jobs which contain a particular keyword
- Click Reports in the menu bar
- Click Invoices and then Search for an invoice
- Add your invoice ID, reference, address, postcode or description
- Click Generate report

This will generate a report showing the Tax date, Invoice number, Customer, Net amount, VAT amount and whether the invoice has been paid.
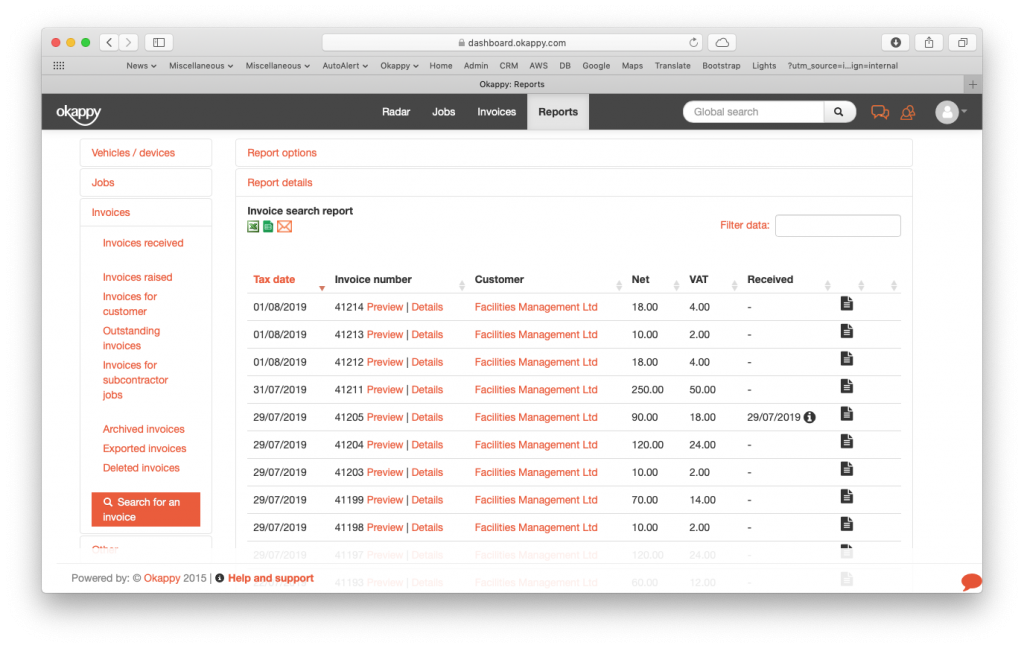
Export your ad hoc (search for invoices) report
You can export your report to Microsoft Excel or Google Sheets where you can further manipulate the data, create charts and graphs or even generate beautiful dashboards which show your key metrics as they change over time.
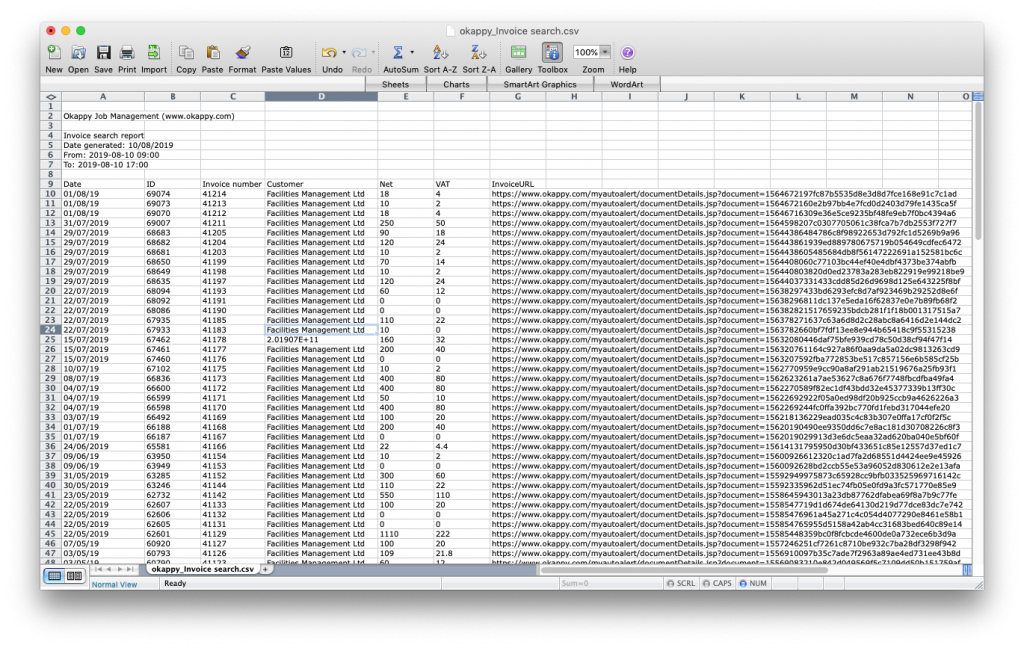
Export search invoices report to Excel
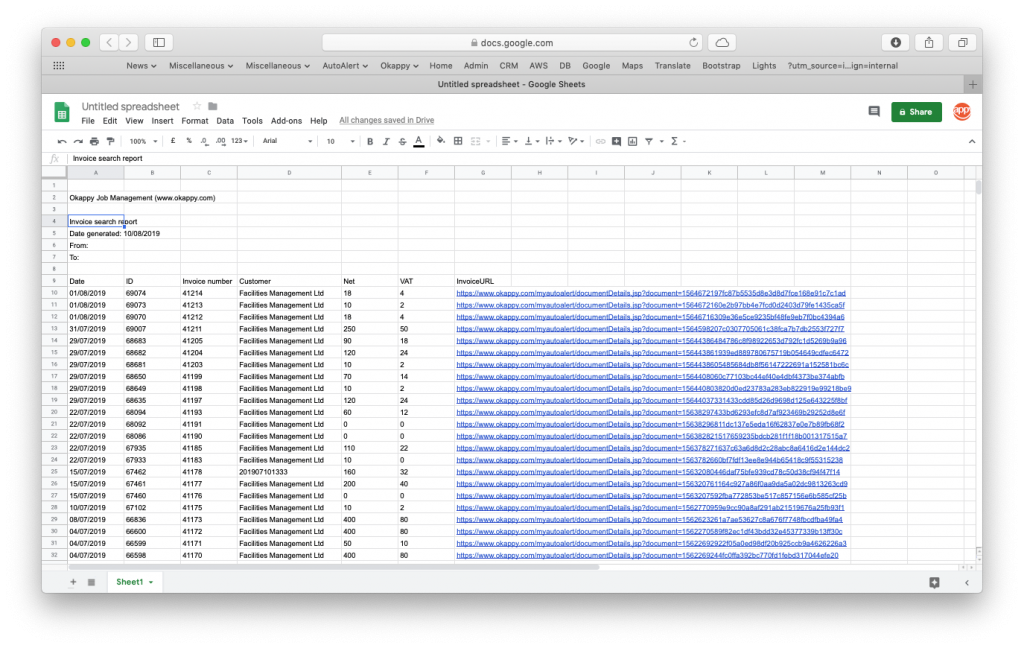
Export search invoices report to Google Sheets
Share your report
You can share your report by email to colleagues or your customer by clicking the email icon ( ![]() ) at the top of the report.
) at the top of the report.

Further information
For further information about the reports you can generate from within Okappy, check the reports section of our support site. Alternatively, check out the questions and answers in our forum.
The post Ad hoc invoices report appeared first on Okappy.
]]>The post Using the Okappy forum appeared first on Okappy.
]]>Using the Okappy forum
Given Okappy’s flexibility, different companies use Okappy in different ways. What better way then to find answers to those burning questions than to ask fellow companies within the Okappy community.
You can ask questions about help and support around the desktop app and mobile apps. You can ask general questions about getting started and you can suggest features and functionality that you would like to see on Okappy.
The forums ar monitored by Okappy so if you haven’t received an answer to your question. Don’t worry we’ll wade in as well.
Read on to find out how to get the most from the Okappy forum.
Signing up to the forum
You can use the Okappy forum as a guest or sign up to create your own profile.
Signing up will allow you to receive email notifications when new questions are asked or when you’ve received an answer to your question.
To sign up to the forum for the first time, click the Register button.

Okappy Forum Register
Forum sections
The forum is split in to different sections covering the getting started with okappy, help and support and new feature suggestions.

Getting started
Get tips and advice about getting started with Okappy. Check what other software Okappy integrates with, ask about specific features and see what other types of company uses Okappy
Desktop questions
Ask questions about using Okappy through your web browser.
Mobile app questions
Ask question about getting the most from your mobile and tablet app, whether that’s on your Apple device, Android or other smartphone.
New features
See what new features people are asking for and get the latest news on what new features have been released.
See the latest questions and answers
All the latest questions and answers are shown in the activity section of the forum.

Okappy Forum Activity
Asking a question
To ask a question,
- Choose which area of the forum you think is most relevant.
- Click New topic
- Add your question with further detail
- Click Submit

Okappy Forum Ask Question
You can subscribe to the question and get an email as soon as an answer has been given.
View your subscriptions
You can set whether you get an email to alert you

Okappy Forum Subscriptions
More help and support
Check out our help and support site for other questions or start asking questions in the forum now.
The post Using the Okappy forum appeared first on Okappy.
]]>The post How best to get help and support appeared first on Okappy.
]]>How best to get help and support
As we grow, the demands on our help and support team have increased. To continue to offer the best support we’ve enhanced how we log, track and respond to queries. You can now get support in more ways. Your support requests will get directed to the customer support team who always aim to get back to you within 24 hours.
Whichever channel you chose, the more information and examples you can provide the better. Screenshots or videos also help us quickly understand which screen you’re looking at and what information you are seeing!
Help and support pages
You’re already here so you know we have lots of articles on how to get the most from the Okappy system. We’re always reviewing them and adding more information so this is the ideal first place to come.
We’ve segmented the pages to follow the main sections of the Okappy platform. Alternatively, you can use our search functionality to find the information you need.
You can also search from within the web app using the global search. Type a word or phrase in the global search, click the magnifying glass and then select the support articles tab for a list of articles which match your search.

Community forum
Our community forum is a good place to ask questions and can be the quickest way to get an answer. It is split into three sections and has enhanced search so you can easily find answers to those question which may have already been asked.
If a question hasn’t been asked previously, there is a wide cross-section of users on the forum which means there is normally someone who can help. If not, our customer support team monitors and prioritise answers on the forum.
The forum is also a good place to log requests for functions and features, as well as get tips and suggestions from other members.
Find out how best to use the Okappy forum.
In-app support

You can get in touch with us via the web and mobile apps.
Email support
We have a dedicated support address which is provided during your on boarding.
Questions get logged and routed to the best person on the team.

Email Okappy
Phone support

Finally, we have a dedicated support line available 24/7. They will take down your details, log the request and forward to the customer support team. As always, the more information you can provide the better, as this helps ensure your query gets sent to the right person and they have all the information they need to investigate.
The number will be provided during your onboarding and depending on your account type.
View the status of your support request
You can view the status of your support requests when logged into Okappy by clicking Help and support towards the bottom of each page. Then choose Support cases.
The post How best to get help and support appeared first on Okappy.
]]>The post Web updates appeared first on Okappy.
]]>Okappy web updates
At Okappy our aim is to continue to provide the simplest and most effective way to manage your work. We’re constantly on the look out for how we can further develop and improve our platform and we release updates frequently.
To view the latest web updates,
- Log into Okappy
- Click the Profile icon at the top right of the screen
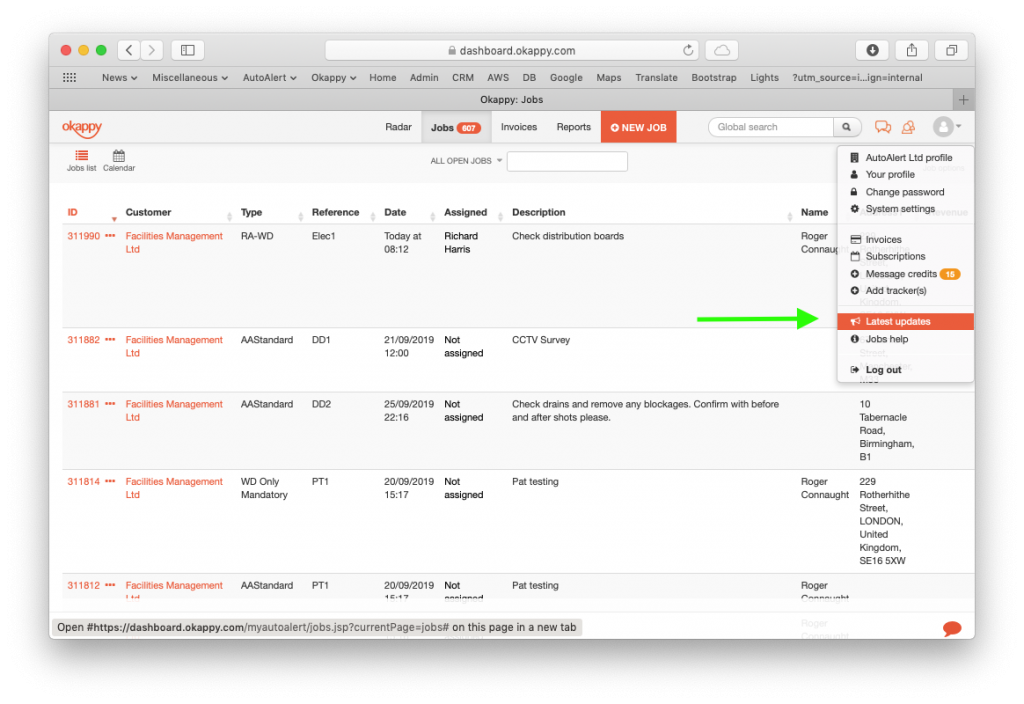
- Click Latest updates

Mobile updates
Request new features
If there is a missing feature, or you think we can do something better, don’t hesitate to let us know. Head over to our forum where you can request new features and view the status of other peoples requests.
The post Web updates appeared first on Okappy.
]]>